Showing posts with label Top Note die. Show all posts

Wednesday, 31 October 2012

Floral District patchwork card

This should only be half a blog post really! This was one of the cards that Kylie had in mind to make for the inspiration station, and allocated to me to make. I got half of it done, and she finished it off. I'm sure she won't mind me sharing it too.


I used the square punch to cut out a piece from every design of the Floral District papers. I tried to arrange them so the same colours or patterns were not next to each other. These were stuck onto Whisper White card stock, in a grid, and then carefully lined up on the Big Shot using the Top Note die. I also ran a piece of Baja Breeze through the Swiss Dots embossing folder, which Kylie then later edged with a stitched effect in White pen. She tied a piece of Lucky Limeade ruffled ribbon around the Top Note shape, and tied a bow. Rich Razzleberry card stock was punched with the Curly Label punch, and the sentiment is from For My Family, which was punched out with the Large Scallop punch.


Monday, 17 September 2012

Shoe Box Swap - Bow Card

Today's card from the Shoe Box Swap class was designed by Ciara Jennings. It's a really simple, but effective card, and the bow looks so fancy. Ciara had provided a template that we used to cut around the Pool Party dotty paper from the In Colour paper stack. The Crumb Cake card blank was stamped in Crumb Cake ink with the Confetti background stamp, inside and on the outside of the card. The Rich Razzleberry card was punched with the Scallop Edge Border Punch, And a strip of So Saffron card stock was placed on top. The sentiment was from Teeny Tiny Wishes and cut out with the Word Window and the Modern Label punches. A flower was punched out using the Itty Bitty punch, with a Pearl in the middle. On the inside, a piece of So Saffron cut with the Top Note die using the Big Shot was added, for somewhere to write the greeting.


Thursday, 17 May 2012

Greenhouse Garden

Today I'm sharing another card that I made at the recent card class in Bradford.  My former upline, Gemma, was selling some of her Stampin' Up! stock, as she's no longer a demonstrator, and doesn't find much time to craft.  So I jumped at the chance to buy her goodies, and Greenhouse Garden was one of the sets I'd had my eye on and she was selling.  It's a Two Step Stampin' set, which means there are stamps in the set that are meant to be layered, or each stamp should be used in conjunction with the other stamps in the set.  The Stamp-a-ma-jig is definitely needed for these sets, and for anyone that's not used one before, it's a tool to help line up stamps so they are perfectly straight, or for set like Greenhouse Garden that layer on top of each other.

For this card, I used Crumb Cake and Pool Party card stock, with papers from the First Edition Speciality papers, cut using the Top Note Die.  I'd seen a few cards on line where images had been stamped onto this set, and was keen to try it myself.  The flowers were stamped with Pool Party, and Island Indigo for the centre of the flowers.  The stalks were stamped in Lucky Limeade.  I used the Colour Spritzer Tool to make the splatters of ink effect, a tool which I don't use enough.  I had one of these as a child, and was pleased to try it out again. The sentiment is from Curly Cute.  The card I brought along to the class to use as the example had the sentiment stamped onto the First Edition papers, but when I was demonstrating the card to the class, I decided to alter it so the Top Note layer was slightly to the right, and stamped the sentiment onto the Pool Party. 

As with most of my cards, I'm looking forward to trying this card again, in different colours and layouts.  Does anyone who has this stamp set have good colour combinations for the flowers I should try?


Papers / Card Stock - Crumb Cake, Pool Party, First Edition Speciality Papers
Stamp Sets - Greenhouse Garden, Curly Cute
Embellishments -
Tools - Colour Spritzer Tool, Big Shot, Top Note Die, Stamp-a-ma-jig
Inks / Markers - Pool Party, Island Indigo

Wednesday, 16 May 2012

Aviary class card

Here's another card from the first Dock Street Market card class.  I'd seen one very similar on line, and loved the layout, using the Aviary stamp set.  I used Marina Mist and Very Vanilla card stock, with Island Indigo and Crumb Cake ink.  The Top Note die was used to cut out the Very Vanilla card stock.  The hello stamp is from Pennant Parade.

It was really good at the class to see how everyone made this card in different ways.  Some people were happy to copy it, exactly, detail for detail.  Others however, wanted to bespoke it, and were unhappy the birds were caged, and wanted to free them!  That's one thing I love about classes, some people want to be led, and others, want to break free!


Card Stock / Papers - Marina Mist, Very Vanilla
Stamp Sets - Aviary, Pennant Parade
Embellishments - Very Vanilla Satin Ribbon, Mini Brads
Tools - Stamp-a-ma-jig, Big Shot, Top Note Die, Paper Piercing Tool
Inks / Markers - Island Indigo, Crumb Cake

Wednesday, 9 May 2012

All Day Training Swaps


A couple of weeks ago, I attended an all day training session, with 30 other Stampin' Up! demonstrators.  It was based around the new Summer Mini Catalogue, and it was the first time I'd seen a lot of the products from the new range.  As a demonstrator, we get access to view the catalogue before it is available to customers, and we can order products early.  It's exciting knowing customers are waiting to get their hands on the catalogue and products, when we get our "sneak peak".  In the morning, we learnt lots of tips and ideas for running classes, and in the afternoon we got hands on and crafty! I'll be sharing the cards and things we made (when I've finished them!).

One of the great things about the day is that we do swaps, we each make an item, a card, or a 3d projects to share with each other.  It gives everyone a chance to have items made from products and stamp sets we might not own ourselves yet, and it really makes a difference to customers than just looking in the catalogue.

 
For my swaps, I used the Tea Shoppe stamp set, and the Twitterpated designer paper series.  Using the Top Note die, I made a tea bag gift holder. You can see in the picture below how the tea bag sits inside, attached with a sticky dot. The inside was stamped with the three small tea cups in Whisper White, and the large tea cup was stamped onto Whisper White card stock using Pear Pizzazz, Baja Breeze, Blushing Bride and Island Indigo inks.  The Just For You and A Cup Of Thanks sentiments were stamped onto the four colours, with the same colour ink, and then punched out with the Modern Label punch. The Top Note die was used to cut out the Twitterpated papers, which was trimmed around the edge, to give a border with the card underneath.  Finally, Pear Pizzazz and Baja Breeze seam binding ribbon was used to tie a small bow at the sides.  Of course, one of the cats had to get involved and help, I wonder if it was the smell of the mint tea that did it!


Tea bag inside the holder
The inside, stamped with Whisper White ink

The pile of swaps

The swaps, boxed and ready to go

Blushing Bride tea cup

Pear Pizzazz tea cup
Island Indigo tea cup

Rusty providing assistance!

I hope you like these new products, I can't wait to share some more things with you.

Monday, 2 April 2012

Stamp a stack - Beautiful Butterflies card

Morning all, hope you are doing well.  Over the next 6 blog posts, I'll be sharing with you the cards that I made at the recent stamp-a-stack card class run by Julie Kettlewell.  Even though I'm a demonstrator myself, I still enjoy attending classes myself, as there's always new tips and techniques to learn, and I love it when I learn something that I can pass on here, or at my classes.  The social side of it is great too, lots of new like minded people to meet, and who understand the desire to own everything in the catalogue!

The first card I'm sharing is made with a few of the Big Shot dies, Top Note and Beautiful Butterflies.  It was a quick and simple card to make, but looks really fancy.  The colours Wisteria Wonder and Island Indigo were used, with Crumb Cake and Very Vanilla.  The stamp set used on the Top Note area is from the Spring Mini catalogue, called You Are Loved. The sentiment is from Sincere Salutations, a set I seem to be using more and more these days, and has been stamped onto a label stamped with the Four Frames set, punched with the Decorative Label Punch. 


Paper / Card Stock - Very Vanilla, Crumb Cake, 2011-2013 In Colour Paper Stack
Stamp Sets - Four Frames, Sincere Salutations, You Are Loved
Embellishments - 2011-2013 In Colour Designer Printed Brads
Tools - Big Shot, Top Note Die, Beautiful Butterflies die, Decorative Label Punch, Vintage Wallpaper Embossing Folder
Inks / Markers - Island Indigo, Wisteria Wonder

Saturday, 10 March 2012

Happy Birthday Owl

Here's a card I made a while ago at one of Julie Kettlewell's team training sessions.  It's a very quick an easy card, there's not much stamping to be done, and just assembling the owl takes a little time.  We cut out a Top Note die shape in Crumb Cake, then embossed it with the Vintage Wallpaper embossing folder.  The leaves are from the Little leaves die, and the owl was punched with the Owl Builder Punch.  The sentiment is from Curly Cute.


Card / Papers - Regal Rose, Crumb Cake, Certainly Celery, Early Espresso, Very Vanilla, Springtime
                       Vintage DSP (retired)
Stamp Sets - Curly Cute
Embellishments - N/A
Tools - Big Shot, Vintage Wallpaper Embossing Folder, Top Note Die, Little Leaves die,
           Owl Builder Punch
Inks / Markers - Early Espresso 

At the training session, we also made this little gift bag, using the Scallop Envelope die. I love making things from items that are different to the obvious way to use them.  The papers are from the retired Springtime Vintage DSP.  The handle was created by punching out a shape with the Word Window Punch, clever eh!


Card / Papers - Regal Rose, Crumb Cake, Early Espresso, Very Vanilla, Springtime Vintage DSP (retired)
Stamp Sets - N/A
Embellishments - Pear Pizzazz Seam Binding Ribbon
Tools - Big Shot, Owl Builder Punch, 1-3/8" (3.5cm) Circle Punch, Scallop Circle Punch, Scallop Envelope Die,  Word Window Punch
Inks / Markers - N/A

Sunday, 29 January 2012

All Day Training

A couple of weeks ago, I attended an all day Stampin' Up! training session with Julie Kettlewell and 33 other members of her team.  It was my second one, and I had a great day. We made five cards with the Create a Cupcake stamps and punch, I ran out of time on the day, and haven't finished them yet, oops! We also did some workshop training, and learnt lots of good tips. I'm looking forward to putting them into practise.  There were some fantastic creations there by Sally Jo & Julie, on the Inspiration Stations. 


Everyone that attended had to make and bring swaps, the idea of this was to share ideas, and everyone gets samples of products they might not have purchased yet.  We didn't do this at my first training, so was really excited to see what everyone made. I now have even more products on my wish list!  These are the lovely swaps I received. 


This is what I made for my swaps, using the Aviary Stamp Set, and a colour combination of Melon Mambo and Old Olive, inspired by the Colour Coach.  The Top Note Die was used to cut Whisper White card stock.  Using the Stamp-a-ma-jig, the owls were stamped, and then the cages were stamped and then heat embossed with the Stampin' Emboss Powder.  It's been ages since I did any heat embossing, I'll have to experiment with it a bit more often.  The For My Family Stamp Set was used for the greeting, and then to finish it off, an Old Olive taffeta ribbon was tied around the card.  Miraculously I had exactly enough for the 35 cards I made, with none spare!


I hope everyone liked them!

Card - Melon Mambo, Whisper White
Papers -
Stamp Set - For My Family, Aviary
Embellishments - Old Olive 1/8" (3.2mm) Taffeta Ribbon
Tools - Big Shot, Top Note Die, Heat Tool, Stampin' Emboss Powder
Inks / Markers - Melon Mambo, Old Olive

Friday, 18 November 2011

Christmas Owl Cards

Hello,

What a lovely evening I had on Wednesday demonstrating at a Stampin' Up! workshop at my friend Ama's house.  There were three ladies who are already customers, and two who had not been to one of my workshops before, but have heard me on numerous occasions raving about the products at craft club and had seen my creations at the Craft Garden for Light Night.  One of the best bits of being a demonstrator is being able to share my excitement and enthusiasm about all of the products, and seeing other people excited too is amazing (and slightly reassuring it's not just me that wants everything in the catalogue!)  Ama made us all tasty cupcakes and chocolate cake so we were all stuffed by the end of the evening.  I meant to take a picture of them to share, but we started eating them too quickly!

Here's a picture of me in action!


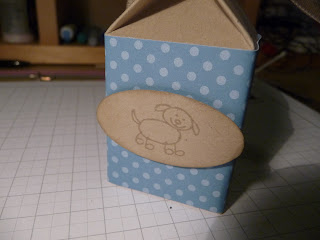
As a thank you to Ama for inviting us all over for an evening of crafty fun, I thought I'd try out my new Mini Milk Carton die, which I bought with some birthday money. Seeing as Ama would be having all the fun, I decided to make a present for her little doggie Ozzie.  I covered the Crumb Cake milk carton with a strip of Designer Paper, and then stamped a dog from the All My Family stamp set (which was sneakily bought from my Stampin' Up! mummy Gemma by my friends as another birthday gift!) onto Crumb Cake and punched it out using the large Oval punch.  I filled the carton with doggie treats, and then used a clip from the Clips Assortment set and finished it off with a bit of Crumb Cake Seam Binding Ribbon.  As you can see on this picture, Ozzie sniffed out that there was a present for him in the box, and he nearly gave the game away as I wanted to wait until everyone was there before giving the gift to the Ama.


Here's the mini milk carton - isn't it cute!


Below are some of the cards we made for the Make and Take, the guests loved it and had a great time making it.  I was really pleased with their cards as they moved things around so they were different to mine.  I'll certainly be using their designs for this card again. The cardstock is Cherry Cobbler, with Crumb Cake cut with the Top Note die.  This was then stamped with Chocolate Chip ink using the Woodgrain background stamp.  I was so pleased when this came into the new catalogue, it's perfect for using with the Owl punch and so much more. The border is Cherry Cobbler from the Regals Collection Designer Paper Stack, with a strip of Old Olive punched with the Scallop Border punch.  The owl itself was punched using Cherry Cobbler, Whisper White, and Crumb Cake, with a leaf cut from Old Olive using the Bird Builder Punch.  The sentiment is from Contempo Christmas stamp set, in Chocolate Chip ink.  The belt of the owl is Basic Black 1/8" (3.2mm) Taffeta Ribbon, finished with a Rhinestone Jewel.


Here's a few other Christmas Owl cards I made, when I was deciding what to do for the Make and Take project. The first is a simpler version of the one above, with Old Olive cardstock. The second one uses the Vintage Wallpaper embossing folder instead of the wood stamp, and has been inked using the sponge daubers on the raised areas.  Curly Cute has been used on these cards for the sentiment.


If you'd like to make any of these items, and would like to host your own Stampin' Up! workshop from the comfort of your own home, please contact me.