Today seems to be a good day for catching up with overdue blog posts, and I'm on a roll - so here it is - the long awaited post about what kept me very, very busy for a few months at the end of the summer. Earlier in the year, I joined a craft club in Headingley, Leeds. It's a great group and I've made lots of crafty like minded friends, who totally understand the addiction to all things crafty! It's very reassuring, to know it's not just me who drools over stamps and wool and craft books! Anyway, one Bank Holiday Monday spent in the pub, a few of us put together a proposal for Light Night Leeds
http://lightnightleeds.co.uk/. Our idea was to create a Craft Garden, using crochet, knitting, felting, paper crafts, and plenty more. We'd originally wanted to put it in garden sheds, but then changed to using the Victorian prison cells under Leeds Town Hall. Things went quiet for a while, when we were waiting to hear about the funding, which then was confirmed, and we had about six weeks until the night. As you can imagine, it was pretty hectic, and we didn't really have an idea what it was going to turn out like until the day before. I don't think there was any of the group who at some point, who didn't have a weird crafty dream, we couldn't even escape the stress of it in our sleep! In the end, it was totally worth it, and there was a constant stream of visitors on the night, with over a 30 minute wait in the queue! It was amazing to hear the compliments and oohs and ahhs, and people asking if they could take pictures.
Unfortunately, I forgot to take my camera with me on the night, but luckily there were a few talented photographers in the group, who have let me use their photos on here. I've mainly posted the photos of stuff I made, but for anyone who wants to see the full set on Flickr, check them out
here. The behind the scene / setting up shots can be seen
here and for an idea of how busy the evening was, see
here.
We had three cells - an English Country Garden, a Night Garden, and a Tropical Garden. Most of my creations were for the English Country Garden. As well as the crafty items, we had a hidden CD playing with bird noises, and some flowery smelling essential oils to make it more realistic and to hide the damp smell!) Below are a few general shots of the cell.
In this picture, you can see my crocheted mange tout, and some vegetables created by some of the other members of the group.
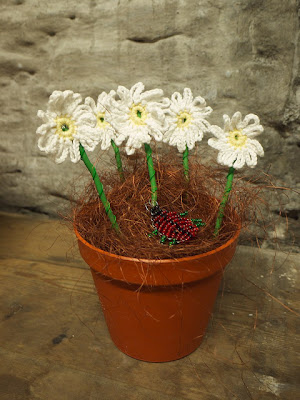
These are the crocheted daisies I made, with a beaded ladybird in the pot too.
These are some more daisies, this time made with the Stampin' Up! Flowers, Daisies #2 Die, in Whisper White card stock, and inked round the edge with Cherry Cobbler ink. The buttons were from my craft stash, and the stems made from garden wire.
Using the Flowers, Daisies die again, I made some gerberras, using Melon Mambo card stock, and inked round the edge with Cherry Cobbler ink.
These are my favourite creation - the fuchsias! These took longer than I want to remember, but I'm really pleased with the outcome. They were made using Melon Mambo, Elegant Eggplant and Old Olive card stock, and punches 5-Petal Flower, Scallop Oval, and Boho Blossoms. These were also inked around the edges with Cherry Cobbler Ink. I think there were about 80ish fuchsias altogether. I got the idea for the fuchsias
here, I love finding new things to make with the punches.
These are my birds, I have made plenty of these this summer! My friend Kylie got married recently (blog post to follow!) and we made these for her wedding. I'd brought them to Craft Club, and they were really popular, and I was asked to make a few for the Craft Garden.
This is a bunny I made from the book "Crafting Springtime Gifts" by Tone Finnanger. In the background on the floor next to the bunny, you can see the leaves made using the Stampin' Up! Leaves #2 die.
I didn't get photos of the next few items on the night, but luckily I took some pictures while they were being made. These are my leaves, made by cutting an inch strip of Old Olive card stock with the Paper Cutter, then scoring it down the middle. Using the Extra Large Oval Punch, the leaf was cut, and then run through the Crimper to give the leaf texture.
This is a picture of another beaded item - bumble bees. I didn't get a good picture of these - they were tied onto invisible nylon string and keep moving around!
Finally, here's a picture of my crocheted fern leaves. I made ten of these, and they were used in the tropical garden.
On this picture, you can see the doughnuts, cakes and felted battenburg cake, made by my sister Judith - don't they look tasty!?
Here's a couple of pictures from the other two rooms. Don't they look great! The Night Garden was full of little LED lights, stars, owls, a fox, mushrooms, toadstools and leaves.
The Tropical Garden was full of recycled items, and loads of clever props to create vines, trees and a waterfall.
So, I think that's the end of my mega post for today. I hope you liked the pictures, and take a look at the rest of them on Flickr. Please contact me if you'd like to know how to make any of them items, or if you want to get your hands on the things to make them.
Leave a comment, I'd love to know what you think!


