Showing posts with label Decorative Label Punch. Show all posts

Wednesday, 25 September 2013

All that glitters!

Morning!

I went to a 40th birthday party last Saturday, it was fancy dress in the style of 80s glam, Studio 54 and New Romantic. After much browsing, I ended up with a costume that was designed to be a buccaneer which I thought looked a bit Adam Ant. 

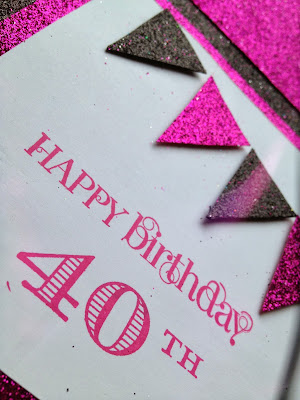
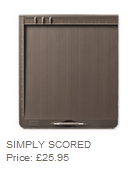
I wanted to do a fancy card for the occasion, and what better design than the Wow card that I've made for a few special occasions. I knew the party was going to be glitzy, and I wanted the card to match. Off I went to my local craft shop, and found the perfect papers.  I used a sheet of 12" x 12" Basic Black card stock, and using the Simply Scored Board I scored the lines to make the folds in the card.  I cut out various triangles of the glitter paper, and stuck them onto the front of the card.  


I used the Curly Cute stamp set for the Happy Birthday sentiment, and the numbers are from the Memorable Moments stamp set, stamped with Melon Mambo ink.  I used the Petite Pennants Builder Punch to make the bunting across the top of the card.


Here's the card all tied up with the band around the middle. The Large Oval Punch was used to punch out the numbers, and the Decorative Label Punch was used for the label.


Items Used

All the items (except the glitter paper) can be bought from my online shop.  Click on the links below.


Friday, 26 April 2013

Team Training - Dapper Dad Card 3

Morning.

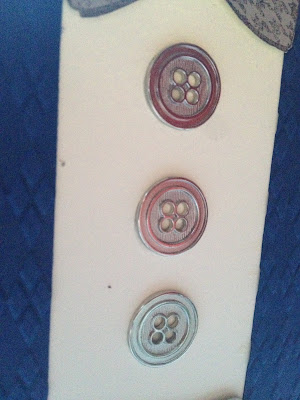
This is the third and final Dapper Dad card that I'll be sharing from the team training day on Saturday.  I love this one, it's so easy and incredibly effective.  The Argyle Embossing folder has been used to emboss two strips of Night of Navy card stock, and have been placed onto a Very Vanilla card blank so it looks like a cardigan.  How clever!  The bow tie stamped image was stamped with Early Espresso ink onto Crumb Cake card stock, and three of the smaller Silver Buttons were placed underneath in a row to look like buttons on a shirt.  The sentiment which reads "It's your birthday, Oh, What fun! Blow out your candles one by one!", has been stamped onto Crumb Cake in Early Espresso ink, and punched out using the Decorative Label punch.  Bakers Twine was tied around the label, and attached to the bottom of the card with dimensionals.


A close up of the three Silver Buttons, don't they look nice and shiny!


A close up of the bow tie, stamped with Early Espresso ink onto Crumb Cake card stock.


If you've been following my Dapper Dad posts this week, I hope you've liked all the cards, and are inspired to use it yourself.  It's £16.95 for the wood mount stamp set (129195) or just £13.95 for the clear mount stamp (129198).  These stamps are so versatile and can be used for lots of different cards.  You don't have to just limit them to masculine cards, at the training day on Saturday one of my fellow demonstrators suggested "blinging up" the watch using pearls or rhinestones for a ladies watch, I thought that was a great idea.  


Wednesday, 28 November 2012

Buns and Roses Workshop - Ornaments card

This post is the third project from the Buns and Roses workshop, and uses the Festival of Prints papers and the Delightful Decorations stamp set and Ornament punch.  The ladies got to choose their paper and could make the card in a selection of colours, of Lucky Limeade, Cherry Cobbler and Island Indigo.  The tricky part of this card was remembering to attach the Bakers Twine to the back of the paper before sticking it down onto the card.  The ornaments were stamped onto Whisper White and then punched out using the Ornament Punch.  The Merry sentiment is from the Snowflake Soiree stamp set, and was punched using the Decorative Label Punch.  


A close up of a Cherry Cobbler ornament, with a Rhinestone Jewel in the centre.


Tuesday, 19 June 2012

Stamp-a-stack 4 - The Open Sea

Morning,
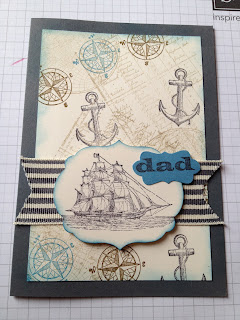
I'm trying to keep up by good blogging behaviour, so here's another post to share with you.  This is the fourth card from the Stamp-a-stack class, and I love this one.  Julie cased it from one of her downline, and I'm glad she shared it with us.  I'd just bought this stamp set, so it's great getting ideas for future cards I'll design myself.

The stamp set used for this card is called The Open Sea, and many of us demonstrators were really excited about this.  It's a great set to use for masculine cards, or where something different is required.  It can be difficult sometimes to come up with designs for men's cards.  The colours used for this card are Marina Mist, Soft Suede, Crumb Cake and Basic Grey.  The images were stamped at random to create a background on the Very Vanilla card stock, and the edges were sponged with Marina Mist.  The ship was stamped and then the Framelits Labels Collection dies were used to cut out the image.  This was mounted onto a strip of Striped Grosgrain Ribbon.  The sentiments were from the For My Family stamp set, and was punched out using the decorative label punch.


Papers / Card Stock - Basic Grey, Very Vanilla, Marina Mist
Stamp Sets - The Open Sea, For My Family
Embellishments - Striped Grosgrain Ribbon
Tools - Labels Collection Framelit Dies, Big Shot, Sponge Daubers, Decorative Label Punch
Inks / Markers - Basic Grey Soft Suede, Crumb Cake, Marina Mist

Friday, 18 May 2012

Little Princess Stamp-a-stack card

I attended a Stamp-a-stack class a few weeks ago, and only getting round to posting these now.  I've got another one in a weeks time, I'll have only just finished posting the last lot and I'll have six more to write up!
 
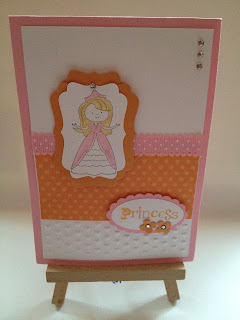
This card uses the Little Princess stamp set, and the colours are Peach Parfait, and Pretty in Pink.  The princess was stamped with Basic Gray onto Whisper White card stock, and her hair was coloured with a So Saffron marker.  The Decorative Label punch was used to cut her out, and then used to make an extended border around her in the Peach Parfait card stock.  The new Adorning Accents Textured Impressions Embossing Folders were used to make the hearts embossed panel at the bottom of the card.  These are thin embossing folders, which can be positioned anywhere on the card.  The Large Oval Punch was used to punch out the Princess sentiment, and then mounted onto the Scallop Oval Punch for a border.  The Itty Bitty Shapes Flower Punch was used to punch out the flowers on the sentiment.  I like this card and stamp set, perfect for all the little princesses in your life!


Papers / Card Stock - Peach Parfait, Pretty in Pink, Whisper White, 2010-20112 In Colour Patterns Designer Series Paper Stack,
Stamp Sets - Little Princess
Embellishments - Rhinestone Jewels, Pretty in Pink Scallop Dots Ribbon
Tools - Big Shot, Adorning Accents Textured Impressions Embossing Folders, Decorative Label Punch, Itty Bitty Shapes Punch, Scallop Oval Punch, Large Oval Punch
Inks / Markers - Basic Gray, Pretty in Pink, So Saffron, Peach Parfait

Friday, 6 April 2012

Stamp a stack - Everybunny card

Morning all,

The Easter weekend is here at last, a few days away from work to relax, just what we all need I'm sure!  I hope you've all got lovely things planned for the weekend. 

Today I'd like to share another card that was made at last weeks Stamp-a-stack session.  The paper Everyday Enchantment is from the recent Sale-a-bration promotion, and unfortunately is no longer available.  The Stamp Set is called Everybunny, and is such a cute set.  It is an Easter stamp set, but it does contain some stamps that could be used the rest of the year too.  The decorative label punch was used to punch around the bunny, and to make the border with the Calypso Coral card stock.  The Boho Blossoms punch was used to make the flowers with the Pool Party card stock.  The bunny was coloured in using the blender pen and the marker pens, I do like a bit of colouring in on a card!


Everybunny Stamp Set images

 
I hope you all get a visit from the Easter bunny, enjoy the chocolate!


Paper / Card Stock - Crumb cake, Calypso Coral, Whisper White, Everyday Enchantment (Sale-a-bration paper)
Stamp Set - Everybunny
Embellishments - Rhinestone Jewels
Tools - Boho Blossoms Punch, Decorative Label Punch
Inks / Markers - Calypso Coral, Pool Party, Crumb Cake, Pretty in Pink

Monday, 2 April 2012

Stamp a stack - Beautiful Butterflies card

Morning all, hope you are doing well.  Over the next 6 blog posts, I'll be sharing with you the cards that I made at the recent stamp-a-stack card class run by Julie Kettlewell.  Even though I'm a demonstrator myself, I still enjoy attending classes myself, as there's always new tips and techniques to learn, and I love it when I learn something that I can pass on here, or at my classes.  The social side of it is great too, lots of new like minded people to meet, and who understand the desire to own everything in the catalogue!

The first card I'm sharing is made with a few of the Big Shot dies, Top Note and Beautiful Butterflies.  It was a quick and simple card to make, but looks really fancy.  The colours Wisteria Wonder and Island Indigo were used, with Crumb Cake and Very Vanilla.  The stamp set used on the Top Note area is from the Spring Mini catalogue, called You Are Loved. The sentiment is from Sincere Salutations, a set I seem to be using more and more these days, and has been stamped onto a label stamped with the Four Frames set, punched with the Decorative Label Punch. 


Paper / Card Stock - Very Vanilla, Crumb Cake, 2011-2013 In Colour Paper Stack
Stamp Sets - Four Frames, Sincere Salutations, You Are Loved
Embellishments - 2011-2013 In Colour Designer Printed Brads
Tools - Big Shot, Top Note Die, Beautiful Butterflies die, Decorative Label Punch, Vintage Wallpaper Embossing Folder
Inks / Markers - Island Indigo, Wisteria Wonder

Sunday, 1 April 2012

Creatively Yours Set

This is another project that I was kept busy with at Kylie's when we had our craftathon weekend! I'd seen this on Pinterest, and thought I'd give it a go. The 2011-2013 In Colours were used, stamped onto Whisper White card stock.

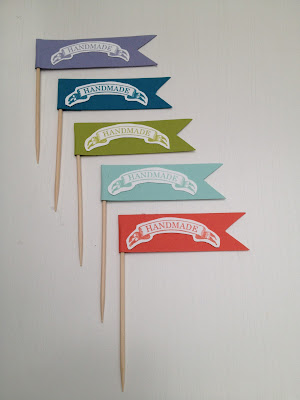
The "Handmade" banner stamp was cut around and placed onto a flag cut in the same colour card stock, and stuck onto a cocktail stick.

The "Made with my own two hands" stamp was stamped and punch with the 1 3/4" Circle Punch and the Scallop Circle Punch.

There was a bit of cutting out to do for the "Made just for you" stamp, and I added a flower punched with the Itty Bitty Bits punch, and added a Rhinestone Jewel in the centre.


The "Handstamped" stamp was just cut around.


The "Deliciously made for you" stamp was punched with the Large Oval Punch and the Scallop Oval Punch, as was the "From the kitchen of"


The "Created By" stamp was punched with the Decorative Label Punch, and ink applied around the edge with the Sponge Daubers.


Here they all are together as a set.  These would look great attached to home made produce or gifts, or just used as sentiments on the back of a card.  For any of you crafters out there that sell your crafts, Stampin' Up! operate under the angel policy, which means you can sell products you have made with Stampin' Up! images, as long as it displays one of the (c) Stampin' Up! images on it to protect their copyright.  


Thursday, 22 March 2012

Fancy Folds Card 2

This is another one of my fancy folds cards, also called a tri-fold card. It was made with Soft Suede card stock, and the Beau Chateau Papers. The Vintage Wallpaper Embossing Folder was used to Emboss the Very Vanilla and Pink Pirouette panels. The Four Frames stamp set was used with the Modern Label Punch, with the sentiment from For My Family.   Unfortunately, now I've uploaded these photos onto here, the colours look a bit washed out, it must have been bad light when I took them.  The card is much brighter!


Papers / Cardstock - Soft Suede, Very Vanilla, Pink Pirouette, Beau Chateau
Stamp Sets - Four Frames, For My Family
Embellishments
Tools - Paper Trimmer/Scorer, Decorative Label Punch, Big Shot, Vintage Wallpaper embossing folder
Inks / Markers - Pink Pirouette, Soft Suede

Tuesday, 14 February 2012

Yet another cupcake card

Here's the fourth card created with the Create a Cupcake set.  I love the bold design and colours of this card, and again, cleverly uses the Cupcake builder punch for another purpose - handbags!  The glimmer paper from the Spring Mini Catalogue has been used for that extra bling effect.


Card / Papers - Real Red, Basic Black, Whisper White, Glimmer Paper
Stamp Set - Create a Cupcake
Embellishments - Rhinestone Jewels
Tools - Cupcake builder punch, Extra-Large Oval Punch, Decorative Label Punch,
            1/2" (1.3cm) Circle Punch, 3/4" (1.9cm) Circle Punch, Big Shot, Vintage Wallpaper Embossing Folder
Inks / Markers - Real Red, Basic Black


Wednesday, 11 January 2012

Team Training

A few weeks ago, I attended a team training session at Julie Kettlewell's house.  We got to see a few sneak previews of items from the Mini Catalogue that had arrived already on the pre-orders, and this is the card and gift we made, using the My Friend set.  That's one of the benefits of being a hostess, we get to see and order the products to play with before they are released in the catalogues.

Both the cards and the gift bag used the colour combination of Lucky Limeade and Concord Crush. The butterflies were cut with the Beautiful Wings Embosslits Die.  The little flowers were punched with the Itty Bitty Shapes Punch.  We made two cards, same design, but with one showing what a difference a few extras make to it, by adding the rhinestones jewels and the Scallop Dots Ribbon, it does make it look that bit more special I think.

The gift bag was made with two Scallop Circles using the Bigz die, and contains a cello bag inside which could be used for sweets or other small gifts.


Card Stock - Lucky Limeade, Concord Crush, Whisper White
Papers -
Stamp Set - My Friend
Embellishments - Rhinestone Brads, Scallop Dot Ribbon, Ruffled Ribbon
Tools - Big Shot, Crop-A-Dile, Decorative Label Punch, Itty Bitty Shapes Punch
Inks/Markers - Lucky Limeade, Concord Crush