Showing posts with label Blossom Punch. Show all posts

Tuesday, 21 May 2013

Wow wedding card

Morning,

This is a blog post that I nearly forgot to write! I thought I'd written it then realised I'd just shared the pictures on my Facebook business page (click here to "Like" if you don't follow me already!).

I made this fancy card a few weeks ago, for a colleague of mine, Richard, who had got married abroad to his partner Maz, and had a big party back here for their family, friends and colleagues.  I knew the theme was bright and colourful, so I decided to use the Patio Party papers to make the card.  I hadn't done any crafting for a while, so decided to make a fancy card that would have a "wow" factor!  Richard came to find me at work a few days ago to ask where I got the card from, and I said that I had made it myself.  He said that it had pride of place in the centre of their cards (maybe I'll ask him to take a photo for me so I can add it to this post) and I was really chuffed.  I love making cards and gifts for people, and am so pleased when they appreciate them too.

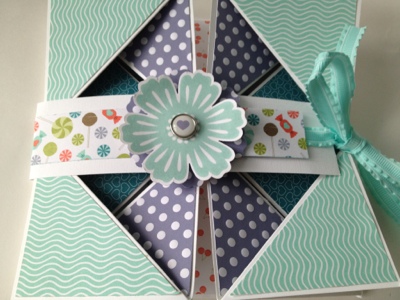
The picture below shows the card folded up, with the band around the middle tied with the Stitched Satin Ribbon.


The card is made from a 12" x 12" sheet of card stock.  Using the Simply Scored Board, a series of vertical, horizontal and diagonal lines are scored, and then the card is folded up.  The Patio Party papers were cut into triangles and arranged so that they looked nice when the card was flat as well as folded up. 


Here you can see the card folded slightly.  Papers have been placed on the inside and the outside of the card.

Here's a photo showing the inside of the card.  The bunting has been punched out with the Petite Pennants Builder Punch, and the pinwheel has been made with the Big Shot and the Pinwheel die.  The sentiments have been stamped in Baja Breeze and Primrose Petals, and are from the Sweet Essentials stamp set. 


Here's a close up of the pinwheel.  A Mini Brad has been placed though the middle, and attached to the card with Dimensionals.


A strip of the 12" white card stock was cut with a strip of the Patio Party papers, and is known as a "belly band".  The ribbon was attached underneath and when tied, holds the card flat.  A ruffled flower was punched out using the Blossom Punch, the card was wetted and scrunched.  Once it dried, the flowers were unfolded and an Antique Brad was placed through the middle.


You can see the detail on the Stitched Satin Ribbon here. 


I've made a few more of these cards recently, they're only half finished though! I've been trying to use up my papers and especially the retired papers from previous catalogues.  I'll be sharing them soon once I finish them!

Wednesday, 6 March 2013

Roses are red

Morning!

This is a post I've been meaning to share for a couple of weeks.  My blogging hasn't been too regular recently, and I'm trying to put that right!  I've got a few things lined up to share, so I just need some time to sit down and get on with writing them.  

This post is to share the flowers I made a few weeks ago, and seeing as it was Valentines Day, I decided to make some roses.  I'd done a bit of Pinterest searching  and had found lots of flower tutorials so thought I'd have a go instead of just pining.  Anyone else guilty of spending too much time browsing for projects to make one day and the list just gets bigger and bigger?  This is a link to the pin showing how these roses were made.  

The card stock colours used for these flowers was Soft Suede, Primrose Petals, Riding Hood Red and Pretty in Pink. They were all daubed around the edges with Cherry Cobbler ink with the Sponge Daubers.  Three flowers were punched using the Blossom Punch, and were assembled using a glue gun.  


The first flower, the centre one has a long glass headed pin through the centre of it, which is what the stems were attached to.  The second and third layers were then joined with the glue gun, and held in place for a few seconds until the glue dried, which keeps hold of their flower shape.


This is a close up of one of the roses.  It looks like there's a bit of glitter around the edges of the petals, but it must be traces of the glue from the gun.  It looks quite pretty! They are spritzed with the Champagne Shimmer Paint so that might be what is showing in the photo.


This picture shows the underneath of the rose, which was made using the retired punch 5 Petal Flower.  I used three different colours of green for these to add a bit of variety - Wild Wasabi, Garden Green and Old Olive.  

The pins were glued to thin green wire stems that I picked up in a local craft shop, and then I wound florist tape around the stem.


This is a basket with glass jars that I picked up from a local shop to display the roses in. It was less than a fiver, and a few days after I'd bought it, I saw one in Laura Ashley for about £12! 


The basket came with a little wooden heart, attached with some ribbon.  I replaced the ribbon it came with with some Cherry Cobbler Seam binding ribbon.


I'll be making these soon again I hope, they'd be great for a special birthday, or for table decorations for a wedding or a party. Let me know what you think!


  1. Papers / Card Stock - Soft Suede, Pretty In Pink, Primrose Petals, Riding Hood Red, Garden Green, Wild Wasabi, Old Olive
  2. Stamp Sets - N/A
  3. Tools - Sponge Daubers, Blossom Punch, 5 Petal Flower Punch (retired), Glue Gun (not SU) 
  4. Embellishments - Cherry Cobber Seam Binding Ribbon
  5. Inks/Markers - Cherry Cobbler
  6. Other - Vase, Basket & Jars, Florist Tape, Glass Headed Pins and Wire Stems (not SU)


Sunday, 24 February 2013

Bag and card set

Afternoon all,

I hope you are all well.  I had a nice break away from work last week, visited my family and fitted in a bit of crafting too.  I'll be sharing what I made last week very soon.  In the mean time, here's a very overdue post about a project that I made at a team training day, I'm not even sure when it was, it was that long ago! I also shared it with my class ladies at my monthly class a few weeks ago.  It's a gift bag and four cards and envelopes set, and I love it!  The papers used are the Natural Composition Speciality Designer Series Papers, and have more of a feel of card, they are think and have a lovely glossy finish.  There's 6 different designs, and there is 2 of each in the set.  The colour combo used was Summer Starfruit and Primrose Petals, two of the colours in 2012/13 In Colours.  I did get a little confused when I placed my order, and accidentally found myself with a pack of the Raspberry Ripple card stock, oops! I'm sure I'll find something to make with it instead.  

These are the four cards that we made.  The butterfly stamps are from the Papillion Potpourri, and they have been punched out with the Elegant Butterfly punch.  


This is the gift bag that the cards fit perfectly inside.  The bag was really easy to make, and the top has been made using the Big Shot and the Adorning Accents Edgelits dies.  The handles are two strips of Primrose Petals card stock, with a bow tied in the Stitched Satin Ribbon.  


This is a close up of the flower that was created by punching 6 flowers with the Blossom punch, wetting them with the Aquabrush, scrunching them up, and unfolding once they were dry.  A Vintage Faceted Button was placed in the middle, and the flower was spritzed with the Gimmer Paint.


Here's one of the cards from the set.  This one is made with the Summer Starfruit card stock.  One of the small Vintage Facted Buttons was placed on the butterfly, and the Itty Bitty Banners stamp set was used for the Thank You greeting.


Here's a close up of the Butterfly, stamped using the Papillion Potpourri, and punched out with the Elegant Butterfly Punch.  Look at the detail on the Natural Composition papers, aren't they lovely.


Here's a picture of the envelopes, stamped with the Summer Starfruit and the Primrose Petals inks.


Friday, 2 November 2012

Floral District zig zag fold card

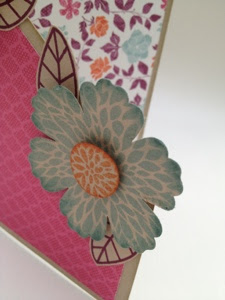
Hello. I've another Inspiration Station card to share today. I'm not sure of the correct name for this card, possibly a tri fold card, but I'm going to call it a zig zag fold card! I'd made one of these before, last year using the Beau Chateau papers and the Beautiful Wings embosslit folder. For this card, I used the Floral District papers, with a Crumb Cake card blank. It's an easier fold than it looks, it's just a matter of scoring from one corner to the other on an A4 sheet of card, then scoring and folding in thirds. I put papers on the three sides that would show at the front, and used the Blossom punch to punch a shape from a stamped image from the Betsy's Blossoms set for the large flowers. The leaves were from the Betsy's Blossoms stamp set too. The centres of the flowers were cut from the same image as the big flowers and punched using a small circle punch.


Monday, 27 August 2012

Crafternoon Tea Class - Mixed Bunch & Everyday Enchantment

The second card we made at the Crafternoon Tea class, was using the Mixed Bunch stamp set with the Blossom punch, and the Everyday Enchantment papers that were brought back in July due to popular demand! The papers were originally available during Sale-a-Bration earlier this year.

The colour combo for this card is Pool Party, Calypso Coral and Lucky Limeade, with Very Vanilla. The circle type images were stamped as a background into the Very Vanilla card, with a strip of the Everyday Enchantment DSP placed towards the bottom. Two flowers were stamped in Calypso Coral, and punched with the matching Blossom punch, with a Lucky Limeade In Colour designer printed brad through the middle. The I'm here for you sentiment is from Petite Pairs.

Monday, 20 August 2012

Craft Decathlon - Wow card!

I think you'll all agree with me, this is a special card! I first made this at the Craft Decathlon class, and then I made it with my card class that I hold on the last Tuesday of every month at Dock Street Market, Leeds. It went down really well, and I'd like to do more 'Wow' projects with them in the future.

A 12"x12" Whisper White card stock was scored at 3" and 9" on both sides, and then diagonally at 3", 6" and 9" on all four sides, using the Simply Scored board. I'm not even going to try to explain how the folds go, it's hard enough explaining it in a class! A range of different papers from the Sweet Shop DSP were cut into squares, and then in diagonal halves. In the centre of the card, a square of Lucky Limeade and Whisper White were placed, and Congratulations from Curly Cute was stamped. Bunting flags were punched using the Petite Pennants Builder punch.

To keep the card closed, a band was made using a strip of 12"x 1.5" card, with a strip of the Sweet Shop papers. Ruffled Ribbon in Pool Party was placed under the strip, so that the band could be tied in a bow. A flower was stamped in Pool Party with a flower stamp from Mixed Bunch, and punched with the Blossom punch. Another flower was punched from the Sweet Shop papers and placed behind and a Jelly Bean brad placed through the centre.

I'm looking forward to the next special occasion where I can make this card. I made another one a week later at the team training event, in Christmas colours. I'll save that one for another blog post.


Wednesday, 15 August 2012

Craft Decathlon - Mixed Bunch Easel Card

Here's the second card from the Craft Decathlon class, this one uses the Mixed Bunch stamp set and Blossom Punch. I received this stamp set for free when I went to the Regional Stampin' Up! Training day in Leeds in May.

Island Indigo card was used for the main card, and was scored with the Simply Scored board. There's so many different things to use the board for, it's an essential item! The Labels Collection Framelit dies were used to cut out the sentiment and border to place on the base of the card so that the easel part stands up. Three flowers were stamped in Calypso Coral, Wisteria Wonder and Island Indigo ink, and punched out with the matching Blossom punch. Three Lucky Limeade flowers were punched out too, and then these were put onto a large frame cut with the Framelit Dies. To finish it off a bow was tied from Pool Party ruffled ribbon.


Tuesday, 12 June 2012

Stamp-a-stack 2 - Mixed Bunch

Morning

Here's the second of the Stamp-a-Stack cards, using the Mixed Bunch stamp set.  I actually received this stamp set at the recent all day regional training day, another one of the benefits of being a Stampin' Up! demonstrator - freebies! I'd previously bought the matching Blossom punch too, so that was handy.

This card uses the colour combo of Pear Pizazz, Peach Parfait, Poppy Parade and Daffodil Delight.  The flowers and shapes were stamped at random on the Whisper White card stock, and then two were stamped and punched out, and fixed with a brad.  A strip of Poppy Parade ribbon was used, and the sentiment punched with the oval and the scallop oval punch.


Papers / Card Stock - Pear Pizazz, Peach Parfait, Whisper White
Stamp Set - Mixed Bunch, Petite Pairs
Embellishments - Rhinestone Brad, Poppy Parade Ribbon
Tools - Blossom Punch, Scallop Oval Punch, Oval Punch
Inks / Markers - Pear Pizzaz, Daffodil Delight, Poppy Parade, Peach Parfait