Showing posts with label Seam Binding Ribbon. Show all posts

Thursday, 9 May 2013

Dress Up Framelits Monthly Training Projects

Morning all!

I've been going through my card and project stash from previous workshops, training and classes, and have realised I have so many outstanding blog posts to share, I'll be busy for ages writing them all.  I can't decide whether to have a craft this evening or write a few quick posts, so I thought I'd try a little of both.  I have a few cards I need to make, a few birthdays are coming up this month and my friend Louise has just given birth to a baby girl, and seeing as she's been a hostess for a workshop before, I'd better impress her with a Stampin' Up! card.  

I attended our team's monthly training last night with Julie Kettlewell and a few other of Julie's Jems.  I was a bit tired and didn't feel like going, and very nearly text to say I couldn't make it, but pulled myself together and drove across to Pudsey.  I was pleased I'd made the effort once I got there, and a chat and craft, and coffee and cake sorted me out for a few hours.  

We based our projects on the Dress Up Framelits dies, and made two cards and a little gift box.  The picture below shows all the projects together.  


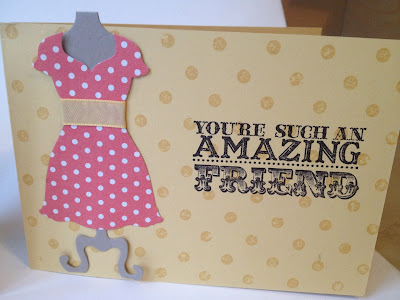
Here's a close up of the simple card.  This is the sort of card that could be demonstrated at a workshop, a nice quick and simple card.  So Saffron card stock was used for the card blank, and it was stamped with the Distressed Dots background stamp in So Saffron ink.  The dress form was cut out using the Dress Up Framelits Dies and the Big Shot from Crumb Cake card stock, and the dress was cut out from papers from Tea For Two.  A strip of So Saffron Taffeta ribbon was tied around the waist of the dress.   The sentiment is from Amazing family, one of the sets that's available from the Spring/Summer seasonal catalogue.


Here's the fancy version of the card, based on the first one but with a few more products added for extra impact.  A longer piece of ribbon has been used to tie a bow on the dress, and Rhinestone jewels have been added to look like a necklace.  A couple of strips of Tea for Two papers have been cut into flags, and a Flower Trim flower has been added.


This is the little gift box we made, using the Simply Scored board to make the box.  Two dresses and forms were cut for the front and the back of the box, and Crumb Cake Seam Binding Ribbon was tied around and into a bow around the waist.  It's just the perfect size to fit in a little bottle of Dazzlin Diamonds, or a ink refiller, which would make a lovely gift for a hostess at a workshop.


The side view of the box.


If you fancy hosting a workshop and would like to see these projects demonstrated and fancy making the card yourself please let me know.  I'd love to show you!

Wednesday, 6 March 2013

Roses are red

Morning!

This is a post I've been meaning to share for a couple of weeks.  My blogging hasn't been too regular recently, and I'm trying to put that right!  I've got a few things lined up to share, so I just need some time to sit down and get on with writing them.  

This post is to share the flowers I made a few weeks ago, and seeing as it was Valentines Day, I decided to make some roses.  I'd done a bit of Pinterest searching  and had found lots of flower tutorials so thought I'd have a go instead of just pining.  Anyone else guilty of spending too much time browsing for projects to make one day and the list just gets bigger and bigger?  This is a link to the pin showing how these roses were made.  

The card stock colours used for these flowers was Soft Suede, Primrose Petals, Riding Hood Red and Pretty in Pink. They were all daubed around the edges with Cherry Cobbler ink with the Sponge Daubers.  Three flowers were punched using the Blossom Punch, and were assembled using a glue gun.  


The first flower, the centre one has a long glass headed pin through the centre of it, which is what the stems were attached to.  The second and third layers were then joined with the glue gun, and held in place for a few seconds until the glue dried, which keeps hold of their flower shape.


This is a close up of one of the roses.  It looks like there's a bit of glitter around the edges of the petals, but it must be traces of the glue from the gun.  It looks quite pretty! They are spritzed with the Champagne Shimmer Paint so that might be what is showing in the photo.


This picture shows the underneath of the rose, which was made using the retired punch 5 Petal Flower.  I used three different colours of green for these to add a bit of variety - Wild Wasabi, Garden Green and Old Olive.  

The pins were glued to thin green wire stems that I picked up in a local craft shop, and then I wound florist tape around the stem.


This is a basket with glass jars that I picked up from a local shop to display the roses in. It was less than a fiver, and a few days after I'd bought it, I saw one in Laura Ashley for about £12! 


The basket came with a little wooden heart, attached with some ribbon.  I replaced the ribbon it came with with some Cherry Cobbler Seam binding ribbon.


I'll be making these soon again I hope, they'd be great for a special birthday, or for table decorations for a wedding or a party. Let me know what you think!


  1. Papers / Card Stock - Soft Suede, Pretty In Pink, Primrose Petals, Riding Hood Red, Garden Green, Wild Wasabi, Old Olive
  2. Stamp Sets - N/A
  3. Tools - Sponge Daubers, Blossom Punch, 5 Petal Flower Punch (retired), Glue Gun (not SU) 
  4. Embellishments - Cherry Cobber Seam Binding Ribbon
  5. Inks/Markers - Cherry Cobbler
  6. Other - Vase, Basket & Jars, Florist Tape, Glass Headed Pins and Wire Stems (not SU)


Thursday, 29 November 2012

Buns and Roses Workshop - Treat Boxes

Morning,

This is the last post about the Buns and Roses workshop.  The fourth project was to make two little treat boxes, that small gifts or sweets can be placed inside.  I've made these a few times now, and they really are easy.  They are just a rectangular piece of paper, scored in half lengthways on the Scoreboard, and then scored from the middle of the narrow side to the fold in the middle.  If you'd like to make these, please send me an email or leave a message on here with your email address and I'll send instructions.  The papers used for this project was Be Of Good Cheer. The crop-a-dile was used to make holes in each side, and Cherry Cobbler seam binding ribbon was threaded through to make a bow on the top.  The Merry Christmas stamp is from Teeny Tiny Sentiments, and was punched out with the Scallop Oval Punch and the Large Oval Punch.  There was a tin of Caburys Heroes on the table, and it was funny seeing a few of the ladies asking how to tie them up, after cramming as many sweets in there as they could (or couldn't as it happened, they can only hold two chocolates!)

I really enjoyed the workshop, and hope to do something like that again sometime.


Saturday, 3 November 2012

Betsy's Blossoms card

Most of the cards that were made for the Inspiration Station were based on the colours in the Floral District set. I had a card commission to make that weekend for a wedding, and I'd spotted a card like this on Pinterest. 


I liked the simplicity of it, so decided to recreate it. I made one card for the Inspiration Station and another for the wedding. The colours are Basic Black, Basic Gray and Rose Red. I used the Betsy's Blossoms stamp set again for this card. Rose red ribbon seam binding ribbon was tied around the card, and a sentiment from Teeny Tiny Wishes (now called Teeny Tiny Sentiments) was stamped and punched with the Large Oval Punch and mounted onto a border punched with the Scallop Oval Punch.

Because the card stock was black, I used the Decorative Label Framelit dies to cut out a shape where the writing could be seen in the inside of the card. I stamped the leaf image for a bit of extra detail.


Thursday, 20 September 2012

Shoe Box Swap - Twitterpated Crackers

This is my last blog post about the Shoe Box swap event. I really enjoyed the day, and am looking forward to the next one.

This post is to share with you the project that was designed by my downline and friend Kylie. She's always coming up with great ideas, I don't know where she finds them! If you fancy taking a look at her blog, click here. These are crackers made with the Twitterpated papers, with the label from the Tea Shoppe stamp set.

The crackers were made by cutting slits in a rectangular piece of paper, which was the rolled into a cylinder and stuck with the sticky strip. Bakers Twine was tied tightly around the ends, and a chocolate sweet, a message and the snap was placed inside. Seam binding ribbon in Cherry Cobbler and Baja Breeze was tied around the ends to hide the Bakers Twine.

I love making or receiving swaps with sweets inside, but these are safe, as don't want to ruin them. They can be my real emergency chocolate stash when I really need it!!


Wednesday, 20 June 2012

Stamp-a-stack 5 - Bordering on Romance card

Here's the fifth card from the Stamp-a-stack class.  This one uses the Bordering on Romance set, a really pretty flowery set, that involves a bit of colouring in.  Everyone likes to embrace their inner child using this set and it keeps everyone quiet for a while! 

The colour combo is Blushing Bride, Pear Pizazz, and Baja Breeze.  The Labels Collection Framelit dies were used for the Whisper White card stock, and the main image of the flowers was also stamped onto Whisper White then coloured in using the markers.  The sentiment is from Sincere Salutations. The bow was made with seam binding ribbon, and is a lovely light material, and ties really nicely.


Papers / Card Stock - Blushing Bride, Whisper White
Stamp Sets - Bordering on Romance, Sincere Salutations
Embellishments - Rose Red Seam Binding Ribbon
Tools - Big Shot, Labels Collection Framelit Dies
Inks / Markers - Pear Pizazz, Baja Breeze, Blushing Bridge, Rose Red

Wednesday, 9 May 2012

All Day Training Swaps


A couple of weeks ago, I attended an all day training session, with 30 other Stampin' Up! demonstrators.  It was based around the new Summer Mini Catalogue, and it was the first time I'd seen a lot of the products from the new range.  As a demonstrator, we get access to view the catalogue before it is available to customers, and we can order products early.  It's exciting knowing customers are waiting to get their hands on the catalogue and products, when we get our "sneak peak".  In the morning, we learnt lots of tips and ideas for running classes, and in the afternoon we got hands on and crafty! I'll be sharing the cards and things we made (when I've finished them!).

One of the great things about the day is that we do swaps, we each make an item, a card, or a 3d projects to share with each other.  It gives everyone a chance to have items made from products and stamp sets we might not own ourselves yet, and it really makes a difference to customers than just looking in the catalogue.

 
For my swaps, I used the Tea Shoppe stamp set, and the Twitterpated designer paper series.  Using the Top Note die, I made a tea bag gift holder. You can see in the picture below how the tea bag sits inside, attached with a sticky dot. The inside was stamped with the three small tea cups in Whisper White, and the large tea cup was stamped onto Whisper White card stock using Pear Pizzazz, Baja Breeze, Blushing Bride and Island Indigo inks.  The Just For You and A Cup Of Thanks sentiments were stamped onto the four colours, with the same colour ink, and then punched out with the Modern Label punch. The Top Note die was used to cut out the Twitterpated papers, which was trimmed around the edge, to give a border with the card underneath.  Finally, Pear Pizzazz and Baja Breeze seam binding ribbon was used to tie a small bow at the sides.  Of course, one of the cats had to get involved and help, I wonder if it was the smell of the mint tea that did it!


Tea bag inside the holder
The inside, stamped with Whisper White ink

The pile of swaps

The swaps, boxed and ready to go

Blushing Bride tea cup

Pear Pizzazz tea cup
Island Indigo tea cup

Rusty providing assistance!

I hope you like these new products, I can't wait to share some more things with you.