Showing posts with label Christmas. Show all posts

Saturday, 8 November 2014

Christmas Wish List & Gift Service

Is this what your letter to Santa looks like?


If so, read on....

I am offering a Christmas Wish List service this year. If you have a list of Stampin' Up! items you'd love to receive on Christmas morning, let me know what's on your list, and then pass my contact details onto your friends and family. 

They can then contact me and tell me how much they'd like to spend, and I will choose items from your list.  

Orders must be received by the 10th of December to guarantee delivery.

Parcels can be sent to a work address, or delivered to me for a gift wrapping service then posted on at cost or collected in person. 

Payment can be made via bank transfer or by telephone using Visa, Visa Debit or MasterCard.

Tuesday, 17 September 2013

New Single Stamps


This is the second set of single stamps released by Stampin' Up! There are eight different stamps to choose from, six of which co-ordinate with Framelit dies or punches. They are available until the 31st January 2014, and they come in clear mount. Which one do you like best?


Tuesday, 3 September 2013

Best of 25 Years - Christmas


Here's the latest Best of...25 Years stamp set, and it's Christmas themed! Get it early and get started on those Christmas cards, you'll thank me in December when they're all made and posted.  The set contains five stamps, and costs just £13.95.  The set is available to purchase until 31st March 2014, or until stocks last.

Friday, 26 October 2012

Watercolor Winter cards

Morning,
I'm glad it's Friday! I hope you all have nice things planned for this weekend. Here's the second of the cards I made during my Christmas card session. I had some old papers left, called Jolly Holiday, from two catalogues ago! I decided I should use up as much as I could. I used a design that Kylie had asked me to make a card for her Inspiration Station, that unfortunately she didn't get a chance to finish off for the display. It's a card with half the front cut off, with the Label Collections Framelit Dies placed over half of the front. That's not explained very well, but I'm sure you'll understand from the pictures what I mean. For the card backgrounds, I used Cherry Cobbler and Old Olive, and the stamp set was the Watercolor Winter. I'm a real fan of this set now, after using it on a few cards recently. The sentiment is from a retired stamp set, Contempo Christmas. This is one of the sets I've had on my list to sell, so let me know if you'd be interested in taking it off my hands. To finish off the poinsettias, I placed a couple of pearls in the centre of the flowers.


Thursday, 25 October 2012

Open up your door

A couple of weekends ago, I was at my Stampin' Up! friend Kylie's house, for a crafty get together. She was getting things organised for her Inspiration Station at our teams quarterly training and I got busy making some Christmas cards to sell. The next four blog posts will show you these cards. I used some retired items on them, to use them all up, so I can justify buying more!

This card was inspired by a card that was made for me last Christmas by a friend, and by the Tea Shoppe dresser card that we made at the Shoe Box Swap day. I made 12 of these cards, 6 using the Woodgrain background stamp for the wood effect and 6 using the new Woodgrain embossing folder in the Big Shot from the Seasonal catalogue. I used Cherry Cobbler card stock for the card blank with Very Vanilla for the background. The pieces of Woodgrain stamped or embossed Crumb Cake were sponged around the edges with the same colour ink with the Daubers. To create the wreath, I used the bird punch leaf, and the berries were punched using the owls eyes from the Owl punch. I made a couple with hearts instead of berries, also punched from the Owl punch.

*Sorry about the bits of glue on the cards, I took the photos before the glue had dried*

If you'd like to buy any of my Christmas cards, please contact me for more details.


Friday, 14 September 2012

Next card class -Tuesday 25th September

This month we will be making another Wow card to impress your friends and family. As the nights are getting closer, and the temperature is dropping rapidly, we'll be making a Christmas card for your special friends and family.

Using the Apothocary Art stamp set and the Framelit dies I will show you how to make a diorama card. You'll be making two cards.

All equipment will be provided, and no experience is necessary. If you have your own craft kit, including scissors and glue, please feel free to bring them along.

The cost of this class will be £12, and as an extra special treat, you'll receive a pot of Stampin' Up! Shimmer Paint to take home with you (worth £4.95) so you'll be able to add a touch of glamour and sparkle to all your projects this Christmas. Early booking is essential if you'd like to take advantage of this offer


Friday, 18 November 2011

Christmas Owl Cards

Hello,

What a lovely evening I had on Wednesday demonstrating at a Stampin' Up! workshop at my friend Ama's house.  There were three ladies who are already customers, and two who had not been to one of my workshops before, but have heard me on numerous occasions raving about the products at craft club and had seen my creations at the Craft Garden for Light Night.  One of the best bits of being a demonstrator is being able to share my excitement and enthusiasm about all of the products, and seeing other people excited too is amazing (and slightly reassuring it's not just me that wants everything in the catalogue!)  Ama made us all tasty cupcakes and chocolate cake so we were all stuffed by the end of the evening.  I meant to take a picture of them to share, but we started eating them too quickly!

Here's a picture of me in action!


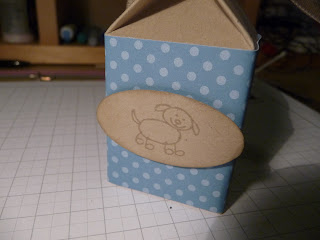
As a thank you to Ama for inviting us all over for an evening of crafty fun, I thought I'd try out my new Mini Milk Carton die, which I bought with some birthday money. Seeing as Ama would be having all the fun, I decided to make a present for her little doggie Ozzie.  I covered the Crumb Cake milk carton with a strip of Designer Paper, and then stamped a dog from the All My Family stamp set (which was sneakily bought from my Stampin' Up! mummy Gemma by my friends as another birthday gift!) onto Crumb Cake and punched it out using the large Oval punch.  I filled the carton with doggie treats, and then used a clip from the Clips Assortment set and finished it off with a bit of Crumb Cake Seam Binding Ribbon.  As you can see on this picture, Ozzie sniffed out that there was a present for him in the box, and he nearly gave the game away as I wanted to wait until everyone was there before giving the gift to the Ama.


Here's the mini milk carton - isn't it cute!


Below are some of the cards we made for the Make and Take, the guests loved it and had a great time making it.  I was really pleased with their cards as they moved things around so they were different to mine.  I'll certainly be using their designs for this card again. The cardstock is Cherry Cobbler, with Crumb Cake cut with the Top Note die.  This was then stamped with Chocolate Chip ink using the Woodgrain background stamp.  I was so pleased when this came into the new catalogue, it's perfect for using with the Owl punch and so much more. The border is Cherry Cobbler from the Regals Collection Designer Paper Stack, with a strip of Old Olive punched with the Scallop Border punch.  The owl itself was punched using Cherry Cobbler, Whisper White, and Crumb Cake, with a leaf cut from Old Olive using the Bird Builder Punch.  The sentiment is from Contempo Christmas stamp set, in Chocolate Chip ink.  The belt of the owl is Basic Black 1/8" (3.2mm) Taffeta Ribbon, finished with a Rhinestone Jewel.


Here's a few other Christmas Owl cards I made, when I was deciding what to do for the Make and Take project. The first is a simpler version of the one above, with Old Olive cardstock. The second one uses the Vintage Wallpaper embossing folder instead of the wood stamp, and has been inked using the sponge daubers on the raised areas.  Curly Cute has been used on these cards for the sentiment.


If you'd like to make any of these items, and would like to host your own Stampin' Up! workshop from the comfort of your own home, please contact me.