Showing posts with label Floral District. Show all posts

Monday, 4 March 2013

Tri Fold Card - February Card Class

Morning,

You may have seen a few days ago I shared a card that I'd made for the Shoe Box Swap event I attended on Saturday.  That card was a different take on the card that I made with my card class last Tuesday evening.  The class was enjoyable, apart from feeling dizzy, but my ladies were very understanding, and even did a bit of swaying around so I felt normal! I held the class at a new venue in the centre of Leeds, which worked ok for the numbers I had, but I'm not sure where it's permanent future home will be just yet!  

This card used papers from the Floral District Designer Series Paper, with Lucky Limeade card stock.  I had provided full instructions, but I'd made a few mistakes! Some were queried before the cards were cut or scored, and avoided a disaster, but a few slipped through the net but luckily I'd brought plenty of spare card in case it was needed.  A good learning tip for me there, to check, and double check my instructions in future! It's an easy card to make, it's just four score lines, and then two cut lines, and the tricky bit is just working out which way the folds should go.


This is a close up of the centre of the card, and uses the Bloomin' Marvelous stamp set, which is one of the Sale-A-Bration freebies, which can be earnt with every £45 spend up until the 22nd March.  It's not too late to book your workshop, and I'd love for you to take advantage of this great promotion, as it only comes round once a year.

I used Rich Razzleberry ink for the bird and the sentiment, Lucky Limeade ink for the leaves, and Daffodil Delight for the flowers.  Rhinestone Jewels were placed in the centre of the flowers for a bit of added sparkle.  These were stamped onto Whisper White card stock which was mounted onto Daffodil Delight card stock.


This is a view of the card from above, showing the folds.


If you'd like to see some of the other items that you could get for free, check out the link here, or take a look at my previous blog post here.  


  1. Papers / Card Stock - Floral District, Lucky Limeade, Daffodil Delight, Whisper White
  2. Stamp Sets - Bloomin' Marvelous
  3. Tools - Paper Trimmer
  4. Embellishments - Rhinestone Jewels
  5. Inks/Markers - Lucky Limeade, Daffodil Delight, Rich Razzleberry


Friday, 30 November 2012

Betsy's Blossoms card

A few weeks ago, Kylie had an open house catalogue launch party at her house.  She'd set up displays of all her projects and cards, and she took us all through the Annual Catalogue and the Seasonal Catalogue.  She'd also baked some tasty cupcakes, which we munched our way through while we got to play with some of the products.  The card below is what she'd prepped for us to make.  The colour combo is Lucky Limeade and Daffodil Delight, with the Floral District papers.  The stamp set is Betsys Blossoms, and the sentiment is from Petite Pairs.


I had a really enjoyable afternoon, it's always fun enthusing about Stampin' Up! products, and Kylie got some really good sales from the afternoon.  She'd done a raffle, and offered the hostess benefits as a prize.  Her friend Louise was lucky enough to win, and got an amazing £60 worth of free products!  Kylie also offered the half price items to us, and I was thrilled when she pulled out my number, so I used it to my advantage to purchase a Big Shot.  That will be really useful, as I've been borrowing Kylies so far for my classes and workshops.

Sunday, 4 November 2012

Centre Step Card

This is the last card of mine I'll be sharing from the Inspiration Station from the team training day. Like my previous post, I can only claim half of this card. I made the card base, and then Kylie finished it by adding the Floral District papers, the stamped images and the sentiment. I like making these fancier cards, they look daunting, but once I've had a go once, they are really simple the next time. I found this template on Pinterest, from this blog here. The only tools you would need to make a card like this is a ruler and pencil, and a paper trimmer with a cutting blade and scorer.


I've just had an idea for a future class...watch this space for an announcement!


Friday, 2 November 2012

Floral District zig zag fold card

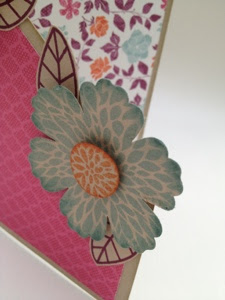
Hello. I've another Inspiration Station card to share today. I'm not sure of the correct name for this card, possibly a tri fold card, but I'm going to call it a zig zag fold card! I'd made one of these before, last year using the Beau Chateau papers and the Beautiful Wings embosslit folder. For this card, I used the Floral District papers, with a Crumb Cake card blank. It's an easier fold than it looks, it's just a matter of scoring from one corner to the other on an A4 sheet of card, then scoring and folding in thirds. I put papers on the three sides that would show at the front, and used the Blossom punch to punch a shape from a stamped image from the Betsy's Blossoms set for the large flowers. The leaves were from the Betsy's Blossoms stamp set too. The centres of the flowers were cut from the same image as the big flowers and punched using a small circle punch.


Wednesday, 31 October 2012

Floral District patchwork card

This should only be half a blog post really! This was one of the cards that Kylie had in mind to make for the inspiration station, and allocated to me to make. I got half of it done, and she finished it off. I'm sure she won't mind me sharing it too.


I used the square punch to cut out a piece from every design of the Floral District papers. I tried to arrange them so the same colours or patterns were not next to each other. These were stuck onto Whisper White card stock, in a grid, and then carefully lined up on the Big Shot using the Top Note die. I also ran a piece of Baja Breeze through the Swiss Dots embossing folder, which Kylie then later edged with a stitched effect in White pen. She tied a piece of Lucky Limeade ruffled ribbon around the Top Note shape, and tied a bow. Rich Razzleberry card stock was punched with the Curly Label punch, and the sentiment is from For My Family, which was punched out with the Large Scallop punch.


Monday, 29 October 2012

Betsy's Blossoms Inspiration Station

I mentioned last week that I'd helped out with an Inspiration Station for our last team training event. I've got a few projects over the next few pages that I'd like to share.

Firstly, here's a picture of the table from the day.


Unfortunately I can not take credit for the majority of the items on there, they were made and arranged so nicely by my downline Kylie. You can find her blog here if you're interested in seeing more of her creations. She'd based her projects around the stamp set Betsy's Blossoms and the Floral District DSP. The colours we mainly used for the project were Baja Breeze, Daffodil Delight, Lucky Limeade, Rose Red, Rich Razzleberry, Tangerine Tango and Whisper White. The thing that was most enjoyable from doing the table was concentrating on one stamp set and papers and exploring all the possibilities of what to do with them. I'm sure any crafters reading this can think of a stamp set they've bought, that's still sitting in its box waiting to be used, or was used once for one card.

The first card I'm sharing is a triangle fold card. I got the template for this from Pinterest, which is great for finding ideas, especially for Stampin' Up! products. Here's the link to the tutorial I used. I used a 12"x 12" sheet of Rosé Red card stock, and cut it to the triangle shape. Next was scoring in the right places according to the tutorial. Then it was just a matter of cutting the Floral District Papers to the correct sizes and sticking them to the front and back of the card. To keep the card closed, I stamped a bird from Betsy's Blossoms and punched it out with the Circle punch and mounted it onto a piece of Rose Red cut with the Scallop Circle punch.

The card shown flat

The card shown with a fold - see how it fits together?

The card folded up
The bird stamp from Betsy's blossoms

I'd like to make some more of this style of card, it's perfect for special occasions or for a special person at Christmas.