Showing posts with label Simply Scored Board. Show all posts

Wednesday, 25 September 2013

All that glitters!

Morning!

I went to a 40th birthday party last Saturday, it was fancy dress in the style of 80s glam, Studio 54 and New Romantic. After much browsing, I ended up with a costume that was designed to be a buccaneer which I thought looked a bit Adam Ant. 

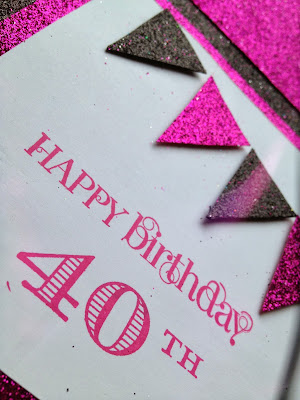
I wanted to do a fancy card for the occasion, and what better design than the Wow card that I've made for a few special occasions. I knew the party was going to be glitzy, and I wanted the card to match. Off I went to my local craft shop, and found the perfect papers.  I used a sheet of 12" x 12" Basic Black card stock, and using the Simply Scored Board I scored the lines to make the folds in the card.  I cut out various triangles of the glitter paper, and stuck them onto the front of the card.  


I used the Curly Cute stamp set for the Happy Birthday sentiment, and the numbers are from the Memorable Moments stamp set, stamped with Melon Mambo ink.  I used the Petite Pennants Builder Punch to make the bunting across the top of the card.


Here's the card all tied up with the band around the middle. The Large Oval Punch was used to punch out the numbers, and the Decorative Label Punch was used for the label.


Items Used

All the items (except the glitter paper) can be bought from my online shop.  Click on the links below.


Tuesday, 21 May 2013

Wow wedding card

Morning,

This is a blog post that I nearly forgot to write! I thought I'd written it then realised I'd just shared the pictures on my Facebook business page (click here to "Like" if you don't follow me already!).

I made this fancy card a few weeks ago, for a colleague of mine, Richard, who had got married abroad to his partner Maz, and had a big party back here for their family, friends and colleagues.  I knew the theme was bright and colourful, so I decided to use the Patio Party papers to make the card.  I hadn't done any crafting for a while, so decided to make a fancy card that would have a "wow" factor!  Richard came to find me at work a few days ago to ask where I got the card from, and I said that I had made it myself.  He said that it had pride of place in the centre of their cards (maybe I'll ask him to take a photo for me so I can add it to this post) and I was really chuffed.  I love making cards and gifts for people, and am so pleased when they appreciate them too.

The picture below shows the card folded up, with the band around the middle tied with the Stitched Satin Ribbon.


The card is made from a 12" x 12" sheet of card stock.  Using the Simply Scored Board, a series of vertical, horizontal and diagonal lines are scored, and then the card is folded up.  The Patio Party papers were cut into triangles and arranged so that they looked nice when the card was flat as well as folded up. 


Here you can see the card folded slightly.  Papers have been placed on the inside and the outside of the card.

Here's a photo showing the inside of the card.  The bunting has been punched out with the Petite Pennants Builder Punch, and the pinwheel has been made with the Big Shot and the Pinwheel die.  The sentiments have been stamped in Baja Breeze and Primrose Petals, and are from the Sweet Essentials stamp set. 


Here's a close up of the pinwheel.  A Mini Brad has been placed though the middle, and attached to the card with Dimensionals.


A strip of the 12" white card stock was cut with a strip of the Patio Party papers, and is known as a "belly band".  The ribbon was attached underneath and when tied, holds the card flat.  A ruffled flower was punched out using the Blossom Punch, the card was wetted and scrunched.  Once it dried, the flowers were unfolded and an Antique Brad was placed through the middle.


You can see the detail on the Stitched Satin Ribbon here. 


I've made a few more of these cards recently, they're only half finished though! I've been trying to use up my papers and especially the retired papers from previous catalogues.  I'll be sharing them soon once I finish them!

Thursday, 9 May 2013

Dress Up Framelits Monthly Training Projects

Morning all!

I've been going through my card and project stash from previous workshops, training and classes, and have realised I have so many outstanding blog posts to share, I'll be busy for ages writing them all.  I can't decide whether to have a craft this evening or write a few quick posts, so I thought I'd try a little of both.  I have a few cards I need to make, a few birthdays are coming up this month and my friend Louise has just given birth to a baby girl, and seeing as she's been a hostess for a workshop before, I'd better impress her with a Stampin' Up! card.  

I attended our team's monthly training last night with Julie Kettlewell and a few other of Julie's Jems.  I was a bit tired and didn't feel like going, and very nearly text to say I couldn't make it, but pulled myself together and drove across to Pudsey.  I was pleased I'd made the effort once I got there, and a chat and craft, and coffee and cake sorted me out for a few hours.  

We based our projects on the Dress Up Framelits dies, and made two cards and a little gift box.  The picture below shows all the projects together.  


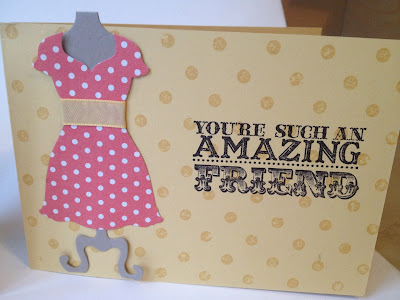
Here's a close up of the simple card.  This is the sort of card that could be demonstrated at a workshop, a nice quick and simple card.  So Saffron card stock was used for the card blank, and it was stamped with the Distressed Dots background stamp in So Saffron ink.  The dress form was cut out using the Dress Up Framelits Dies and the Big Shot from Crumb Cake card stock, and the dress was cut out from papers from Tea For Two.  A strip of So Saffron Taffeta ribbon was tied around the waist of the dress.   The sentiment is from Amazing family, one of the sets that's available from the Spring/Summer seasonal catalogue.


Here's the fancy version of the card, based on the first one but with a few more products added for extra impact.  A longer piece of ribbon has been used to tie a bow on the dress, and Rhinestone jewels have been added to look like a necklace.  A couple of strips of Tea for Two papers have been cut into flags, and a Flower Trim flower has been added.


This is the little gift box we made, using the Simply Scored board to make the box.  Two dresses and forms were cut for the front and the back of the box, and Crumb Cake Seam Binding Ribbon was tied around and into a bow around the waist.  It's just the perfect size to fit in a little bottle of Dazzlin Diamonds, or a ink refiller, which would make a lovely gift for a hostess at a workshop.


The side view of the box.


If you fancy hosting a workshop and would like to see these projects demonstrated and fancy making the card yourself please let me know.  I'd love to show you!

Saturday, 20 April 2013

Team Training - Tuxedo Card

Evening!

What a lovely sunny day it's been.  I've missed most of it, as I attended a Julie's Jems team training event run by Julie Kettlewell.  The theme of today was cards for men, as it's something I think most crafters struggle with at times.  There's loads of lovely sparkly pretty crafty stamps, colours and embellishments out there for feminine girly cards, so Julie decided to get us out of our comfort zone and challenge us!  We did some crafting, which I'll be sharing over the next few days, and we had some great business training too.  Stampin' Up! is a great opportunity whether you want to be a hobby demonstrator, or turn it into a business.  It's flexible too, it can fit around your life and more effort can be put in when life is less busy.  As Julie pointed out today, demonstrators only get out of it, the effort they put into it.

We also had a special guest today, Paula Gorry who is the UK Business Development Manager at Stampin' Up! UK.  It was really nice meeting her and chatting to her, and hearing about how Stampin' Up! operates.  She did a crafting demonstration for us, and we all learnt a few tips and tricks.  It's great seeing other peoples ideas, and seeing things we wouldn't have thought up ourselves.

We always do swaps for out training events, and as the day was based around cards for men, so were our swaps.  I spent a bit of time on Pinterest getting a few ideas together, and decided to use a tutorial to make a tuxedo card.  The link to the tutorial can be found here from Lynn Pratt, an American demonstrator.  Normally when we hand out or swaps, it's a mad half an hour of going around the room trying to find who we haven't swapped with yet! Today we did it in a more structured manner, which worked well.

I used Basic Black and Whisper White card stock to make the jacket and the shirt. I printed out the template and traced them onto the card stock and used the Paper Snips and the Paper Trimmer to cut them out.  The Simply Scored Board and the scoring blade on the Paper Trimmer were used to score the lines.  I used the Dimensionals to stick down the collar edges on the jacket and shirt, and one to hold the two sides of the jacket down.  The bow tie was cut out and also stuck down with Dimensionals.  Lastly I used the Sweet Buttons Embossalit die with the Big Shot to cut out the button for the front of the jacket, which was also attached using the Dimensionals.

I made thirty of these, but forgot to take a picture of them all finished, so here's a picture of just one of them.


Below is a close up picture of the button cut from the Sweet Buttons Embossalit die.


Here's a photo showing the shirt part of the card pulled up from inside the jacket.  This could be the area the message is written on, or could have a sentiment stamped onto.


Sunday, 2 December 2012

Customer Workshop

Morning,

I thought I'd share the projects I made at a customer workshop last month.  Ama kindly held a workshop at her home, and invited a few friends and family along for an evening of crafting.  There was a few non crafters, but they enjoyed it still, and did a great job at the make and take card, which is shown below.  We used the Scentscational Season stamp set and matching Holiday Collection Framelits dies, and Curly Cute was used for the Seasons Greetings sentiment.  Ama has a few pieces of the Emma Bridgewater pottery, so this card was perfect with the stars.


I also showed Ama and her guests how easy it was to make a little gift holder, using the Labels Collection Framelits dies.  I used the Be of Good Cheer papers on this gift.  As a thankyou for hosting the workshop, I gave this to Ama, and inside it contained lots of ribbons and buttons for her to use on her own cards and projects. 


I also showed them how easy it was to make an envelope using the Simply Scored Board, and a sheet of Designer Paper Series.  They really do look good, and they are so much nicer than a plain envelope.


Ama is a great baker, and she always puts on a good spread!  Her cakes were delicious.


We all had a nice evening, and Ama received some great benefits for hosting the workshop.  She earned £40 of free products, and chose some lovely items.  If you'd like to host a workshop, please let me know.  I have a few spaces available before Christmas, it could be a great opportunity to get some gifts if you have crafty friends, or to buy products to make Christmas cards, it's not too late still!  Don't forget the fantastic offer is still on for the free set of ink pads, available when workshop sales reach £325.  That's in addition to the £50 you'd have to spend on products from the Catalogues, and a half price item. 


Thursday, 29 November 2012

Buns and Roses Workshop - Treat Boxes

Morning,

This is the last post about the Buns and Roses workshop.  The fourth project was to make two little treat boxes, that small gifts or sweets can be placed inside.  I've made these a few times now, and they really are easy.  They are just a rectangular piece of paper, scored in half lengthways on the Scoreboard, and then scored from the middle of the narrow side to the fold in the middle.  If you'd like to make these, please send me an email or leave a message on here with your email address and I'll send instructions.  The papers used for this project was Be Of Good Cheer. The crop-a-dile was used to make holes in each side, and Cherry Cobbler seam binding ribbon was threaded through to make a bow on the top.  The Merry Christmas stamp is from Teeny Tiny Sentiments, and was punched out with the Scallop Oval Punch and the Large Oval Punch.  There was a tin of Caburys Heroes on the table, and it was funny seeing a few of the ladies asking how to tie them up, after cramming as many sweets in there as they could (or couldn't as it happened, they can only hold two chocolates!)

I really enjoyed the workshop, and hope to do something like that again sometime.


Wednesday, 19 September 2012

Shoe Box Swap - Easel card

Here's another card from the Shoe Box Swap day, and it was the last one I made on the day. There were two long tables and each side of the room swapped with people on their table. There were a whole range of other projects and cards on the other table that I didn't get to make. At the end, we all had a spare, as someone couldn't make it, so we did a lucky dip to swap. I got this project, designed by Kate Martin (check out her blog here).  It's an easel style card, and the colour combo is Basic Gray, Whisper White and Pretty In Pink. Two scallop squares were cut with the Big Shot, and the Scallop Square Bigz Clear die. The Pretty In Pink layer was scored with the diagonal plate on the Simply Scored board. The flowers were stamped from the set Everything Eleanor, and had Glass Stampin' Glitter sprinkled into glue in the middle. I'd not used this glitter before, so it was nice to see what it was like. The leaves were punched out with the Bird Builder Punch, I like using a product to make something different to what it is obviously designed for, in this case, bird wings. The Small Oval punch cut out the border for the Hello sentiment from Tiny Tags, which was cut with the Word Window Punch.

The inside of the card was decorate with a square of Pretty In Pink, and a strip of Basic Gray was punched with the Scallop Trim Border Punch. A bow was tied from Pretty In Pink 1/4" Grosgrain Ribbon.


Thursday, 30 August 2012

Crafternoon Tea Class - Sweet Boxes

Here's the final item we made at the Crafternoon Tea event. Little triangular boxes, made with Sweet Shop DSP, using the Simply Scored board.

A rectangular piece of paper cut to 8 cm x 16 cm was the starting point. We scored the papers at 8 cm on the long side, and then marked the middle of the short side, at 4 cm. A score line was then made from the middle of the short side down to the fold on the long side.

The crop-a-dile was then used to make a hole in each side, and then Ruffled Ribbon was tied through and tied into a bow or a knot at the top. The Oval All stamp set was used for the sentiment, which was punched out with the Scallop Oval Punch.

I really like these, and I can see myself making a few more in the future. Any papers could be used, and they don't take long to prepare or make. We were given some chocolates to place inside them at the class, but they quickly got eaten when I got home. That thing we all do, open the cupboards, look in the fridge, sit down, then do it again hoping some chocolate has appeared...it's great having a craft room full of treat boxes like this, a perfect emergency stash that I forget is there.