Wednesday, 29 February 2012

Dinosaurs

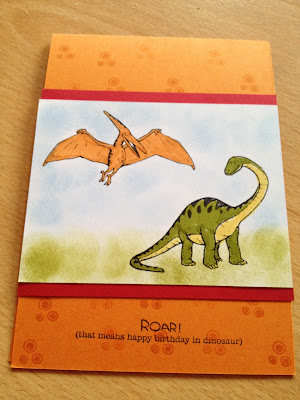
Here's another of the Stamp-a-stack cards. I really enjoyed making this one, mainly because when I saw it I thought I wouldn't like making it. It looks so arty, with the sponged sky and grass, and I thought mine would just look a bit rubbish! But I hope you'll agree, mine came out looking pretty good in the end. It's great trying new techniques that I'd have shied away from initially.
The stamp set Dinoroar was used on this card, it's a perfect set for children's cards.  The sky and the grass were really easy to do, using the sponge daubers, and the key way definitely doing a little at a time and building it up until it looked right. It's really effective, and does look harder than it was.


Paper / Card - Real Red, Pumpkin Pie, Whisper White
Stamp Set - Dinoroar, Make a Monster
Embellishments - N/A
Tools - Sponge Daubers
Inks / Markers - Pumpkin Pie, Old Olive, Daffodil Delight, Bashful Blue, Basic Black

Monday, 27 February 2012

Celebrate


Here's the second card from the Stamp-a-stack class. It's another bunting card, there's quite a few of them appearing on my blog! The colour combo is Tempting Turquoise and Real Red. The flags were punched from the Petite Pennants Builder punch, and the Celebrate stamp is one of the Sale-a-bration sets Outlined Occasions. The mini brads were used between the flags, and the Real Red Glimmer Brads were used on the sentiment, which was punched with the Large Oval and the Scallop Oval Punches.


Card / Papers - Whisper White, Tempting Turquoise, Paper Stack Brights
Stamp Set - Outlined Occasions
Embellishments - Mini Brads, Glimmer Brads
Tools - Petite Pennants Builder Punch, Scallop Oval Punch, Large Oval Punch, Paper Piercing Tool, Mat Pack
Inks / Markers - Real Red, Tempting Turquoise
Don't forget, Sale-a-bration is only available until the 31st March. After this time, these sets and papers will no longer be available. They are the free sets you can receive for every £45 you spend, or when you host a workshop that achieves over £300 in sales. Book your workshop now before it's too late!

Saturday, 25 February 2012

Aviary card

Last night I attended another one of Julie Kettlewell's stamp-a-stack card classes, we made twelve cards in three hours, two each of six designs. I'll be posting these over the next week or so.
The first I'd like to share uses the Aviary stamp set, one that I own, and can't wait to try this design again. The colour combo on this card was Melon Mambo, Pool Party, Lucky Limeade with Crumb Cake. The Scallop Edge Border Punch was used, and the large Scallop Punch was used for around the owl and cage. The sentiment is from Petite Pairs, which is a nice set, it comes with sentiments for the outside and inside of your cards. To finish off the card, Old Olive Taffeta ribbon was used to make a bow for the top of the cage, and for the top left corner with a Rich Razzleberry button.


Card / Paper - Pool Party, Lucky Limeade, Crumb Cake, Paper Stacks - 2011-2013 In Colour and Brights
Stamp Set - Aviary, Petite Pairs
Embellishments - Old Olive 1/8" Taffeta Ribbon, Brights Designer Buttons
Tools - Large Scallop Punch, 1-3/4" Circle Punch, Scallop Edge Border Punch
Inks/Markers - Basic Gray, Melon Mambo

Friday, 24 February 2012

I {Heart} Hearts Friend Card

Here's another card I made early on when I received my starter kit.  The colour combo is similar to my last post, but with Pretty In Pink added, to Baja Breeze and Perfect Plum.  This was another CASEd card from Splitcoaststampers.  This is a great website if you are ever stuck for ideas with what to do with your Stampin' Up! stamp sets. I tried out the tearing technique on this card, something I see done all the time, but don't often do myself.


Card / Papers - Baja Breeze, Whisper White
Stamp Set - Trendy Trees, I {Heart} Hearts
Embellishments - Whisper White Satin Ribbon
Tools
Inks / Markers - Baja Breeze, Pretty in Pink, Perfect Plum

Wednesday, 22 February 2012

Crocheted IPhone case

I've got something a bit different to share with you today, a non Stampin' Up! post for a change. I've made a crocheted iPhone case. I've made a few of these now, the first one was made by accident really! I was making a dish cloth for a friend, and realised half way through it was the right size for an iPhone, so it ended up perfect. The second one, which is the blue one in the pictures, I tried a slightly different design, and it ended up too big. The third attempt, the pink one, this one has worked out right. It's been made with double treble stitches.  


Vintage Vogue Friend Card

Evening

I've got another card to share with you today, using one of the stamp sets I received in my starter kit last year when I signed up to be a demonstrator.  It uses the Vintage Vogue set, and I think I CASEd it from Splitcoaststampers, but can't find it now! I'm going to have to improve my inspiration searches, and stop just saving the picture but write down where I found it too.  For anyone that doesn't know, CASE stands for Copy and Share Everything, which is a great way to share ideas and try new designs, remembering to give credit to the original crafter.

It uses the colour combo of Baja Breeze and Perfect Plum.  There was a bit of cutting out to do for this one, as the set doesn't have a matching punch.  Wouldn't it be nice if they all did, but then we'd just have more we needed to buy!


Paper / Card - Perfect Plum, Baja Breeze, Whisper White
Stamp Set - Vintage Vogue
Embellishments - Pearl (non-Stampin' Up!), Whisper White Satin Ribbon
Tools
Inks / Markers - Baja Breeze, Perfect Plum

Monday, 20 February 2012

Trendy Trees

Today I'd like to share with you a card made with one of the very first stamp sets I bought from Stampin' Up! Trendy Trees, I loved it straight away.  It's one of the Two-Step Stampin' sets, and works well with the Stamp-a-ma-jig.  If you've not heard of this before, I'll explain a bit more below.


I used a Crumb Cake base, with a Certainly Celery sheet from the Subtles Designer Series Paper Pattens Stack.  The trees were stamped in Old Olive and Certainly Celery, and the trunks in Soft Suede.  This is where the Stamp-a-ma-jig comes in handy.  It's a tool for lining up Two-Step Stampin' sets, in this example, the tree tops and the trunks are two separate stamps, and it can be difficult to get them lined up in the right place.  The Stamp-a-ma-Jig can also be used to line up sentiments, or make sure you're stamping in the right place.  It's definitely an essential tool to own.  If you'd like a demonstration of how it works, please contact me to book a workshop.


Papers / Card - Crumb Cake, Subtles DSP Patterns Stack, Very Vanilla
Stamp Sets - Trendy Trees,
Embellishments - Pear Pizzazz Seam Binding Ribbon
Tools - Scallop Edge Border punch, Modern Label punch
Inks / Markers - Old Olive, Certainly Celery, Soft Suede

Saturday, 18 February 2012

Wedding Bunting

As mentioned on my last post, making the sign wasn't the only bit of crafting I volunteered for, for Nev & Kate's wedding.  Kate had mentioned that she was thinking of making some bunting, and I said I'd help, having some sewing machine skills.  So one Friday evening, I went to theirs with my sewing machine, pins and pinking shears ready to make a few triangles.  I'd never made bunting before, so the first few were trial and error, and eventually we decided on a design.  When I asked how much they wanted, Kate said "60m". I wasn't really sure how many triangles that was, so she set Nev on with the maths task, and when he pulled a funny face and said "Erm, it's about 300...." I nearly fell off my chair! We got started on a production line on their kitchen floor, and got marking with the chalks, cutting and pining. 


By the end of the evening, we realised we'd need a few more meters of fabric, so I headed home with my triangles ready to be stitched, and they headed back to the market for more fabric.  A week or so later, I returned with what I'd done so far, and then got started with the next lot.  You know you've done a lot of crafting when your hands bleed - the pinking shears had rubbed a big blister into my thumb from all the cutting!

Eventually, I had all the triangles sewn and cut. Next came pining them to the seam binding tape.  This took a while, as you can imagine.  Luckily, a friend offered to help with this, which made it easier, and soon was sewing.  Rusty offered assistance here too, watch those pins in your paws!


Finally, I got it all finished, and was very pleased with it, and hoped they were too.  I didn't know exactly how they were planning to display it at the reception, so you can imagine my delight when I walked in and saw this.


This was a board for a jigsaw, pieces were scattered on each of the tables, and it made into a picture of the happy couple.


A few weeks later, the bunting went on another trip out, this time for Kylie's hen do, to decorate the barge we went on from Shipley.  We had afternoon tea and bubbly to keep us going on the journey!


I hope the bunting gets to go on more trips out!

Friday, 17 February 2012

My team has expanded!

Afternoon,

I thought it was about time I shared some exciting news with you - I have recently acquired my first downline.  My friend and fellow crafter, Kylie has joined my team as a demonstrator.  It something she was thinking about for a while, and she decided to join during Sale-a-bration, as she could choose any stamp set for free from the catalogue. This is such an incentive, if you've had your eye on any of the more expensive stamp sets, could this be the time for you to join me too?  The starter kit is £119, and contains over £250 worth of products, and you can pick and choose your colours of inks, markers, ribbon, card and stamp sets.  Click here to find out more.


I'm really looking forward to having Kylie on board, we chat about Stampin' Up! and crafting regularly anyway, but it will really focus us to get together and try new ideas and techniques and share ideas.  The number of projects I have found on the Internet, and thought - "I'll try that one day", well now maybe I actually will have a go.  I look forward to sharing our creations with you.

Thursday, 16 February 2012

Wedding Banner

This is a very overdue post, from the middle of last summer! I don't think I had my blog set up then, and have always planned on writing it up.  I was asked by two friends, Nev & Kate, if I would make them a customised banner for above a table at their wedding.  I'd made them a congratulations for getting engaged card as a Make and Take card, at the second Stampin' Up! workshop I attended hosted by Gemma Rathbone - check out her blog here (also when I took the plunge and signed up to be a demonstrator!).  They liked the card so much, they asked for a banner in the same style.  Naturally, I thought and planned it for months, and then left it to the weekend before to actually make it! Here's what I came up with.


Don't all those pies and pasties look tasty! Unfortunately, I was in the middle of doing Slimming World in preparation for being a bridesmaid at another wedding a few months away, so I somehow managed to resist!

For the sign, I covered a piece of plywood with Crumb Cake cardstock, then embossed Certainly Celery cardstock with the Perfect Polka Dots embossing folder.  I then cut flowers using the Fun Flowers die from the (now retired) Springtime Vintage paper from the 2011 Mini Catalogue.  I used the Big Designer Buttons in the middle of the flowers.  I used the Beautiful Wings Embosslit die to cut some butterflies, in Baja Breeze, Rose Red and either Pink Pirouette or Pretty in Pink (I can't quite tell from the picture!).   Hearts and flowers were punched using the Heart to Heart punch, and the Boho Blossoms punch and the retired hostess level one set Punch Potpourri. I finished it off with Rhinestone jewels in the centre of the flowers and on a few of the butterflies. 

I received lots of compliments for the sign, and I'm pleased with how it came out.  I did some other crafting for this wedding, but I think that deserves it's own blog post, so keep an eye out!  The wedding itself was lovely, really relaxed and casual, and the speeches certainly brought a tear to everyones eye!


Tuesday, 14 February 2012

Amour

Hello,


Hope you have all had a nice day.  I've found a card in my stash that I made last year when Gemma Rathbone organised a card making workshop at Buns & Roses WI.  It's perfect to share with you today.  It uses the Artistic Etchings Stamp Set.  The medallion was stamped with the White Craft Stampin' Pad, and then the Eiffel Tower was stamped in Basic Gray onto Sahara Sand card, and then crumbled to give a distresses look, with Basic Gray ink brushed onto the edges.  The side was punched with the now retired Spiral Border Edge Punch.


Inside the card

Paper / Card- Basic Black, Sahara Sand, Very Vanilla
Stamp Set - Artistic Etchings
Embellishments - Rhinestone Jewel
Tools - Spiral Border Punch, Small Heart Punch
Ink / Markers - Real Red, White Craft Ink, Basic Gray


Last card from the training day

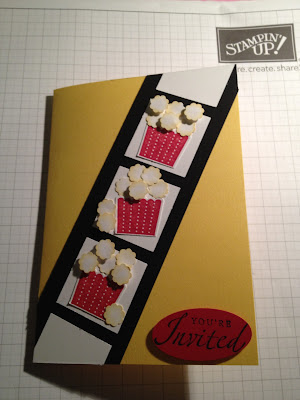
Here's the last card I have to share with you from the All Day Training.  It uses the Create a Cupcake stamp set and punch to make a little carton, for popcorn made using the Itty Bitty Shapes punch.  One thing I didn't mention earlier, is that when we were making these cards at the training day, the six of us on the table worked together and each took a bit of the card so we got them done quickly.  For this one, myself & Kate punched and inked the edges of 20 popcorn each, for 6! I think I dreamt of popcorn that night.


Paper / Card - Daffodil Delight, Real Red, Whisper White, Basic Black
Stamp Sets - Create a Cupcake, Sincere Salutations,
Embellishments -
Tools - Large Oval Punch, Itty Bitty Shapes Punch, Cupcake punch, 1-3/8" (3.5cm) Square punch
Inks / Markers - So Saffron, Basic Black, Real Red


This is the Baggie Book that we created with all five cards.  It's a great way to show lots of cards using the same stamp set, and can easily be passed round at a class or a workshop and the cello bags keep the cards clean and protected.  I'd like to make these for all my stamp sets, one day I'll get round to it!


Happy Valentine's Day

I hope you've all received a stack of cards today! Seeing as everywhere is full of hearts, flowers and romance at the moment, I thought I'd have a play with one of my embossing folders that I'd not yet used. I've used the other two I have - Vintage Wallpaper and Square Lattice, but the Manhattan Flower was still in its packet.

I tried it three different ways, just to experiment. The first uses Cherry Cobbler card, and a textured piece of Whisper White was embossed, cut out, then sponged with Cherry Cobbler Ink. The sentiment is from Vintage Vogue.


The second uses a shiny textured card stock (non Stampin' Up!).


The third, also uses a non Stampin' Up! Card stock, which has a white core, which I sanded away to create a bit of texture. The sentiment was stamped in Pretty in Pink ink.


They're all nice I think. On the insides I put a piece of Whisper White, and used the I {Heart} Hearts set to add more detail. A lesson for you all here...do your stamping before sticking to the card! Had a slight disaster here with my clear stamp falling off the block, inked, and fell in the wrong place. Luckily the glue hadn't quite dried, and I was able to rescue it. Learn from my mistakes!


Card / Papers - Cherry Cobbler, Whisper White
Stamp Sets - Vintage Vogue, I {Heart} Hearts
Embellishments -  
Tools - Sanding Block, Big Shot, Manhattan Flower embossing folder
Inks / Markers - Cherry Cobbler, Pretty In Pink


Here's a quote for you all today, which I think is nice.

"There is only one happiness in life, to love and be loved". (George Sand) 

It was on the recent BBC drama Birdsong, which I'm reading at the moment.  When I heard it, I knew I'd seen it before.  Looking through some photos afterwards, I found this picture, taken at the wedding of my friends Kylie & Paul in October.


Have a nice day x

Yet another cupcake card

Here's the fourth card created with the Create a Cupcake set.  I love the bold design and colours of this card, and again, cleverly uses the Cupcake builder punch for another purpose - handbags!  The glimmer paper from the Spring Mini Catalogue has been used for that extra bling effect.


Card / Papers - Real Red, Basic Black, Whisper White, Glimmer Paper
Stamp Set - Create a Cupcake
Embellishments - Rhinestone Jewels
Tools - Cupcake builder punch, Extra-Large Oval Punch, Decorative Label Punch,
            1/2" (1.3cm) Circle Punch, 3/4" (1.9cm) Circle Punch, Big Shot, Vintage Wallpaper Embossing Folder
Inks / Markers - Real Red, Basic Black


Monday, 13 February 2012

Cupcake card three

Here's another card to share with you that uses the Cupcake set.  Are you starting to want these products yet??

This time, I've used the Cupcake builder punch to create clouds.  See, I told you it was versatile!  The basket of the hot air balloon was made using the punch too, and then embossed using the Square Lattice embossing folder to create a basket effect.


Card / Papers - Soft Suede, Bashful Blue, Real Red, Whisper White
Stamp Set - Create a Cupcake, Dot, Dot, Dot Background Stamp
Embellishments - Linen Thread
Tools - Big Shot, Perfect Polka Dots Embossing Folder, Square Lattice Embossing Folder,
            1-13/4" (4.4cm) Circle Punch, Large Oval Punch, Word Window Punch, Modern Label Punch, Cupcake builder punch,
Inks / Markers - Soft Suede, Real Red


More Cupcakes

Morning,

This will be my first scheduled post, so let's see if I have mastered this if it works or not.

Here's the second All Day Training Cupcake card for you to see.

This one shows how you can use the Cupcake builder punch without the use of the stamp set, to make ice cream cones, yum! The cones are stamped using Soft Suede Ink with the Pennant Parade Stamp Set.


Cards / Papers - So Saffron, Pretty In Pink, Pool Party, Whisper White, Real Red
Stamp Sets - Pennant Parade, Create a Cupcake
Embellishments - 2011-2013 In Colour Designer Printed Brads
Tools - Large Oval Punch, Scallop Oval Punch, Cupcake builder punch, Petite Pennants builder punch,
            Scallop Trim Border Punch, Sponge Daubers
Inks/Markers - Soft Suede, Pretty in Pink 

Sunday, 12 February 2012

Everyday Enchantment Papers

In an earlier post, I mentioned the great products that are available during Sale-a-bration. These cards and bags were made during the All Day Training event I attended recently. The two cards show examples of what could be made for a Workshop make and take project, and they use the colour combination of Calypso Coral, Pool Party and Crumb Cake.  The second card uses the gorgeous papers Everyday Enchantment, and both use the Elementary Elegance Stamp Set, both of which are available for free with every £45 order.  


Papers / Card - Calypso Coral, Pool Party, Crumb Cake
Stamp Set - Elementary Elegance
Embellishments - Calypso Coral Ruffled Ribbon
Tools - Curly Label punch
Inks / Markers - Crumb Cake, Calypso Coral


Papers / Card - Calypso Coral, Pool Party, Crumb Cake, Everyday Enchantment DSP
Stamp Set - Elementary Elegance
Embellishments - Calypso Coral Ruffled Ribbon, 2011-2012 In Colour Designer Printed Brads,
                           Mini Vintage Tags
Tools - Curly Label punch, Big Shot, Blossom Party Die
Inks / Markers - Calypso Coral

This was my favourite part of the training.  Julie shared with us a template to make a cute handbag gift bag, it was so quick and easy to make.  You can't quite see it from the pictures, but where the flower is at the top of the bag, is a velcro sticky dot, which can open and close, just like a real bag.  If you'd like to have a demonstration on how to make this, please contact me, I'd love to show you.


Papers / Card - Pool Party, Crumb Cake, Lucky Limeade, Everyday Enchantment DSP
Stamp Set - Elementary Elegance
Embellishments - Calypso Coral Ruffled Ribbon, Mini Vintage Tags, 2011-2012 In Colour Designer
                          Printed Brads
Tools - Big Shot, Blossoms Party Die, Crop-a-dile
Inks / Markers - Calypso Coral


Create A Cupcake

Evening

At the recent All Day Training, we made a five cards using the Create a Cupcake stamp set and the builder punch.  I love this set, and have made a few cards with it now.  It's so easy to use, and is so versatile.  My next few posts will show you what a range of cards it can be used for.  You can use the stamp set on its own, or just the punch, but as you'll see, having both is worthwhile.

The first card uses the colour combination of Wisteria Wonder, Lucky Limeade and Calypso Coral.  It's such a quick and easy card, with the added bonus of using the punch to cut out the cupcake, you could make one of these in no time!


Cards / Papers - Wisteria Wonder, Lucky Limeade, Calypso Coral
Stamp Set - Create a Cupcake
Embellishments - Calypso Coral Ruffled Ribbon
Tools - Cupcake builder punch, Large Scallop Circle Punch, 1-3/4" (4.4cm) Circle Punch, Scallop Edge Border Punch
Inks/Markers - Calypso Coral, Wisteria Wonder, Crumb Cake

Sale-a-bration


Sale-a-bration is here.  I'm a little late with this post, but it's not too late to take advantage of the three ways you can benefit from the offers from Stampin' Up! at this exciting time of year.

1.  For every £45 you spend, you receive a free product, a stamp set or papers.  Click here to view the products.


2. Host a workshop.  There are additional benefits for hosts during this time, more free goodies!  If your workshop sales reach £300, not only will you receive £50 hostess pounds to spend, and one item from the catalogue at 50% off, but you'll also get a sale-a-bration item free too. Of course, the more the sales are the better the benefits for you! See the table below for more information.


3. Join my team.  To purchase the starter kit, only costs £119, which contains over £250 worth of products.  You can customise your choice of stamps, inks, pens, papers, and if you join during sale-a-bration, you can choose any additional stamp set.  This is a great bargain.


Contact me to take advantage of these offers while you can!