Friday 31 May 2013

The retirement list is here!


The retirement list is here at last! Get your hands on items from the 2012-13 Catalogue that will no longer be available after the 1st July.  Many items are only available while stocks last too, so don't hesitate in placing your order with me so you don't miss out.  Some items are discounted too, so you can get some bargains too.  The items with the red dots have 40% off, and the items with the orange dots have 25% off.

Please click here to view the retiring stamp sets.

Please click here to view the retiring accessories, including papers, card stock, inks, ribbons, embellishments, tools, punches, Big Shot dies and fabric.

This is a perfect time to place an order, or hold a workshop or private class.  On top of the hostess benefits, and a guaranteed evening of fun, you could get some bargains too! Contact me now to book your event.


Saturday 25 May 2013

Spring card class 4 - For The Birds

This is the fourth card from the spring card class. The colour combo of this card is Old Olive and Melon Mambo.


You can see the Naturals Whites card stock in this image, it has a flecked appearance. I like how this gives an alternate option to just using Whisper White all the time.

The image from the For The Birds stamp set was coloured in using the blender pen with the ink pads. Kylie showed us three different techniques to colour in the images, one with just the markers, one with the blender pen and inks and one using the paintbrush and inks.


In this picture you can see the button and the Scallop Dots ribbon.


I do like cards that involve a bit of colouring in! I hope I can borrow this set sometime and have a play with it and make some cards for my stash!

Friday 24 May 2013

Spring card class 3 - Flowering Flourishes

Hello,

As with quite a few of my posts on here, this is a scheduled post that I wrote on Monday evening.  I love catching up on writing my blog posts and sharing all my makes, and tend to write a few all in one go.  I've got  about 15 posts in drafts at the moment waiting to be written!  I think I wrote a few posts ago that I'd finished my box set of Ashes to Ashes and Life on Mars, and I've just found that all the old episodes of Waterloo Road are on Lovefilm Instant, so guess what I'll be watching for a couple of weeks when I get the chance!

Today's share is another card that I made a couple of weeks ago at the Spring card class.  I enjoyed making this card, as I got to try a stamp set that I'd never really paid much attention to in the catalogue, or had a play with.  There's so much choice these days, it's nearly impossible to use them all, let alone own them all (in my dreams!)  The stamp set is called Flowering Flourishes, and can be found on page 121 of the Stampin' Up! Annual Catalogue.

We stamped the Flowering Flourishes stamp onto Very Vanilla using Crumb Cake ink, and then sponged the edges too.  The Happy Birthday Wishes sentiment is from Petite Pairs, and was stamped in Early Espresso and punched out with the Extra Large Oval Punch.  Two circles were punched out using the circle punches (I'm afraid I don't know what sizes we used, I was too busy making them into flowers!), which were cut with the paper snips into a spiral and then twisted to form a flower.


Thursday 23 May 2013

Spring card class 2 - Bees

Hi,

Here's the second card that I made at the Spring card class a few weeks ago. For the background, we used Whisper White and Basic Black card stock, and embossed Daffodil Delight using the Honeycomb embossing folder with the Big Shot. The sentiment is from Friendly Phrases, and was stamped onto Whisper White with Stazon ink, as we were advised at the class that its less likely to bleed in the way that the Basic Black inkpad can sometimes do on the white card. The bees are from the Spring Sampler stamp set, these were also stamped with Stazon ink, and were coloured with the markers. Dazzling Diamonds was placed on the wings to give a little sparkle. They were punched out using the 1" Circle punch, and one was mounted onto a background punched with the Scallop Circle punch.


Wednesday 22 May 2013

Papillion Potpourri Card 5

This is the last Papillion Potpourri card that I'm sharing from the quarterly training event.  The colours used in this card are a lovely combination of Pool Party, Midnight Muse and Summer Starfruit.  As with so many of the cards that I make and share with you, it's such a simple card, there's just a couple of colours of card stock, and inks involved.    A couple of Rhinestone Jewels were added to the centre of the butterflies for a bit of extra sparkle, and apart from that, it is a really simple card.


The stamp set is called Blooming With Kindness, and has five sentiments and the lovely flower image.  At just £16.95 for the clear mount set, it's such a versatile set, and could be used for so many different occasions.  


Tuesday 21 May 2013

Wow wedding card

Morning,

This is a blog post that I nearly forgot to write! I thought I'd written it then realised I'd just shared the pictures on my Facebook business page (click here to "Like" if you don't follow me already!).

I made this fancy card a few weeks ago, for a colleague of mine, Richard, who had got married abroad to his partner Maz, and had a big party back here for their family, friends and colleagues.  I knew the theme was bright and colourful, so I decided to use the Patio Party papers to make the card.  I hadn't done any crafting for a while, so decided to make a fancy card that would have a "wow" factor!  Richard came to find me at work a few days ago to ask where I got the card from, and I said that I had made it myself.  He said that it had pride of place in the centre of their cards (maybe I'll ask him to take a photo for me so I can add it to this post) and I was really chuffed.  I love making cards and gifts for people, and am so pleased when they appreciate them too.

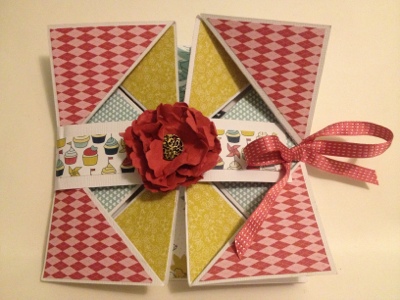
The picture below shows the card folded up, with the band around the middle tied with the Stitched Satin Ribbon.


The card is made from a 12" x 12" sheet of card stock.  Using the Simply Scored Board, a series of vertical, horizontal and diagonal lines are scored, and then the card is folded up.  The Patio Party papers were cut into triangles and arranged so that they looked nice when the card was flat as well as folded up. 


Here you can see the card folded slightly.  Papers have been placed on the inside and the outside of the card.

Here's a photo showing the inside of the card.  The bunting has been punched out with the Petite Pennants Builder Punch, and the pinwheel has been made with the Big Shot and the Pinwheel die.  The sentiments have been stamped in Baja Breeze and Primrose Petals, and are from the Sweet Essentials stamp set. 


Here's a close up of the pinwheel.  A Mini Brad has been placed though the middle, and attached to the card with Dimensionals.


A strip of the 12" white card stock was cut with a strip of the Patio Party papers, and is known as a "belly band".  The ribbon was attached underneath and when tied, holds the card flat.  A ruffled flower was punched out using the Blossom Punch, the card was wetted and scrunched.  Once it dried, the flowers were unfolded and an Antique Brad was placed through the middle.


You can see the detail on the Stitched Satin Ribbon here. 


I've made a few more of these cards recently, they're only half finished though! I've been trying to use up my papers and especially the retired papers from previous catalogues.  I'll be sharing them soon once I finish them!

Monday 20 May 2013

Spring card class 1 - Swallowtail

A couple of Saturdays ago, I went to a spring themed card class at my downline Kylie's house. We made four cards, and ate two lots of cake. Perfect! I'll be sharing the four cards over the next few posts so keep an eye out if you like the card I'm sharing today.

The main product used in this card is the Swallowtail stamp. This is the same size as the large background stamps, and the detail on it is amazing. We stamped the image onto Daffodil Delight card stock using Versamark ink, and then put on Pool Party embossing powder which was then heated using the Heat Tool. This gives a lovely raised effect. We then painted on Shimmer Paint to give the butterfly a shiny sparkle. This was then mounted onto Very Vanilla cardstock and then onto Pool Party card stock.


Here's a close up shot of the Swallowtail stamped image. Isn't the detail great?


Here's a close up of the sentiment, which is from Perfectly Penned. This was also stamped with Versamark and heat embossed with Pool Party embossing powder.

Tuesday 14 May 2013

Papillion Potpourri Card 4

Here's the fourth Papillion Potpourri card.  This card has a fancy technique on it that you might want to try if you never have before.  The butterflies have the same embossed pattern as the background, but have colour added.  The butterflies were punched out with the Elegant Butterfly punch, and the Petals-a-plenty embossing folder had Wisteria Wonder ink rubbed all over it.  The butterflies were run through the Big Shot, and the result is that the ink is transferred to the flatter areas of the embossed card.  Clever eh!  The Scallop oval punched card was run through the Big Shot too, and mounted onto a Primrose Petals card which had been punched out with the Scallop Oval Punch. A strip of the Stitched Satin Ribbon was placed across the card.


Monday 13 May 2013

200th Blog Post! Special Offer - Free Goodies!


Special Offer!

Here's a special offer to celebrate my 200th blog post!

Are you interested in hosting a Stampin' Up! Workshop in the comfort of your own home? 

Now is the perfect time to get in touch, and book your party now. 

Until the end of June, I am offering £15 extra to spend from the Stampin Up! Catalogues on products of your choice (with a minimum of a £150 workshop orders). 


This is a fantastic offer, in addition to the hostess benefits you'll receive anyway, and I can guarantee a couple of hours fun.

What's more, if you book a workshop between now and the end of May, if your workshop sales reach £250, you'll receive an extra £25 to spend from Stampin' Up!


Here's the inside of the gift voucher you'll receive if you book a workshop between now and the end of June. The voucher isn't attached, so you can reuse the voucher for your own gifts to your family and friends!


Here's a shot of the inside of the gift card.  There's space to add a couple of photographs for that personal touch.


Contact me now to book! Don't miss out!

Papillion Potpourri Card 3

Morning,

This is a scheduled post that I wrote on Saturday afternoon, watching the last couple of episodes of Ashes to Ashes.  I get a bit hooked on box sets and series and I don't know what my next one will be...any recommendations?

Here's the third Papillion Potpourri card that I made at a quarterly training day. The Fancy Fan embossing folder was used on the Crumb cake card, and then cut in the middle with the Scallop Edge Border Punch.  The Best Wishes stamp is from Petite Pairs, and the Butterfly is from the Papillion Potpourri set.  The Elegant Butterfly punch was used to cut out the butterfly which was mounted onto a circle punched with the 1-3/8" Circle Punch and the Scallop Circle Punch. A little Vintage Faceted Button was placed onto the front of the butterfly.  Lastly some Rhinestone Jewels were placed onto the front of the card for a bit of sparkle! 


I've just realised that my next post will be my 200th!  I might make something special to share with you!


Sunday 12 May 2013

Papillion Potpourri Card 2

Morning,

I hope you're all having a nice weekend.  This is a scheduled post I wrote last week whilst trying to catch up on my blogging, which has been neglected for a while.  This is another Elegant Butterfly punch and Papillion Potpourri card that I'm showing you today.  The colours on this card are Gumball Green, Melon Mambo and Pumpkin Pie.  The Gumball Green card blank was stamped in the same colour ink, and the five butterflies on the front were stamped using the Stamp-a-ma-jig to get then placed in the right position.  The Melon mambo strip of card stock was cut with the Finishing Touches Edgelits Dies in the Big Shot.  Finally, another butterfly was stamped in Melon Mambo ink, punched out with the Elegant Butterfly punch and positioned on top of one of the stamped butterflies using a dimensional, and then had a Vintage Faceted Designer Button placed in the centre.  Really nice and simple eh!


Saturday 11 May 2013

Papillion Potpourri Card 1

I can't remember how long I have had these cards to share on here.  These were part of a project we made at one of the quarterly team training events, and I never got round to posting them.  There's five cards to share, all using the Papillion Potpourri stamp and the Elegant Butterfly punch. 

This first card uses Calypso Coral card stock with the Natural Composition speciality designer papers. A background was stamped on the card stock with Calypso Coral ink with the Papillion Potpourri stamps.  Two butterflies were stamped onto Very Vanilla card stock in Calypso Coral and Early Espresso ink and punched out with the Elegant Butterfly punch. 

A piece of the Crochet Trim was tied around the front panel, and had a piece of Linen thread tied around.  The Mr & Mrs sentiment was stamped with Tiny Tags, and punched with the Jewelry Tag Punch and attached to the Linen Thread.

I have lots of the Natural Composition papers left in my stash, I'm going to get them out and have another play with them soon.


Friday 10 May 2013

Happy Birthday bird card

Afternoon!

Are you glad it's Friday? I am, it's been a long week, even though we did have a Bank Holiday this week. I'm a little disappointed today, as many of my crafty friends are heading down to the Stampin' Up! regional training event in Telford today. This is a yearly day event, and was held in Leeds last year, which was handy for me! The event is tomorrow so most people are stopping in a hotel overnight so they get there early tomorrow. I'm not going this year as I decided to save my pennies for Convention in November, which I also missed last year. No excuses this year, it's in Manchester so I'm determined to go.  I can't wait to see pictures and hear all the stories from the day and see what they all made.

Today I'm sharing a card I made this week for a friend's birthday. I fancied doing something new that I'd not done before so I got onto my Pinterest boards where I pin my inspiration and cards to copy. I've that many saved I don't know when I'll get round to making them all!

I used Bashful Blue card stock for the card blank, and stamped Crumb Cake ink onto Very Vanilla card stock using the Woodgrain background stamp. These were cut into strips of 2cm wide and trimmed to the size I liked. I daubed around the edges with Crumb Cake ink to give the fence panels a bit of depth. The Happy Birthday sentiment was stamped with Wild Wasabi ink using the Itty Butty Banners stamp set and was cut out using the matching Framelit dies. Lastly a bird was punched out in Baja Breeze and Daffodil card stock, and the branch cut from Wild Wasabi. A Rhinestone Jewel was used for the eye of the bird and Mini Brads were placed on the ends of the horizontal fence panel to look like nails.


Thursday 9 May 2013

Dress Up Framelits Monthly Training Projects

Morning all!

I've been going through my card and project stash from previous workshops, training and classes, and have realised I have so many outstanding blog posts to share, I'll be busy for ages writing them all.  I can't decide whether to have a craft this evening or write a few quick posts, so I thought I'd try a little of both.  I have a few cards I need to make, a few birthdays are coming up this month and my friend Louise has just given birth to a baby girl, and seeing as she's been a hostess for a workshop before, I'd better impress her with a Stampin' Up! card.  

I attended our team's monthly training last night with Julie Kettlewell and a few other of Julie's Jems.  I was a bit tired and didn't feel like going, and very nearly text to say I couldn't make it, but pulled myself together and drove across to Pudsey.  I was pleased I'd made the effort once I got there, and a chat and craft, and coffee and cake sorted me out for a few hours.  

We based our projects on the Dress Up Framelits dies, and made two cards and a little gift box.  The picture below shows all the projects together.  


Here's a close up of the simple card.  This is the sort of card that could be demonstrated at a workshop, a nice quick and simple card.  So Saffron card stock was used for the card blank, and it was stamped with the Distressed Dots background stamp in So Saffron ink.  The dress form was cut out using the Dress Up Framelits Dies and the Big Shot from Crumb Cake card stock, and the dress was cut out from papers from Tea For Two.  A strip of So Saffron Taffeta ribbon was tied around the waist of the dress.   The sentiment is from Amazing family, one of the sets that's available from the Spring/Summer seasonal catalogue.


Here's the fancy version of the card, based on the first one but with a few more products added for extra impact.  A longer piece of ribbon has been used to tie a bow on the dress, and Rhinestone jewels have been added to look like a necklace.  A couple of strips of Tea for Two papers have been cut into flags, and a Flower Trim flower has been added.


This is the little gift box we made, using the Simply Scored board to make the box.  Two dresses and forms were cut for the front and the back of the box, and Crumb Cake Seam Binding Ribbon was tied around and into a bow around the waist.  It's just the perfect size to fit in a little bottle of Dazzlin Diamonds, or a ink refiller, which would make a lovely gift for a hostess at a workshop.


The side view of the box.


If you fancy hosting a workshop and would like to see these projects demonstrated and fancy making the card yourself please let me know.  I'd love to show you!

Wednesday 1 May 2013

This and That - New Products!


Stampin' Up! have released an exciting new product from the 2013-2014 Annual Catalogue!

Between the 1st to the 31st May, you can purchase 5 of the products from This and That in a bundle and save 15%, at just £29.24.  The products can be ordered separately from June, but think of the discount!  The bundle consists of a journal, designer papers, a rotary stamp, stickers and washi tape.


Check out the video below to find out more.


If you'd like to get your hands on this offer, let me know.  I'll be having a play with it soon, so please look out for some posts and pictures.