Friday 18 November 2011

Christmas Owl Cards

Hello,

What a lovely evening I had on Wednesday demonstrating at a Stampin' Up! workshop at my friend Ama's house.  There were three ladies who are already customers, and two who had not been to one of my workshops before, but have heard me on numerous occasions raving about the products at craft club and had seen my creations at the Craft Garden for Light Night.  One of the best bits of being a demonstrator is being able to share my excitement and enthusiasm about all of the products, and seeing other people excited too is amazing (and slightly reassuring it's not just me that wants everything in the catalogue!)  Ama made us all tasty cupcakes and chocolate cake so we were all stuffed by the end of the evening.  I meant to take a picture of them to share, but we started eating them too quickly!

Here's a picture of me in action!


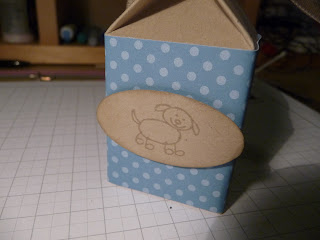
As a thank you to Ama for inviting us all over for an evening of crafty fun, I thought I'd try out my new Mini Milk Carton die, which I bought with some birthday money. Seeing as Ama would be having all the fun, I decided to make a present for her little doggie Ozzie.  I covered the Crumb Cake milk carton with a strip of Designer Paper, and then stamped a dog from the All My Family stamp set (which was sneakily bought from my Stampin' Up! mummy Gemma by my friends as another birthday gift!) onto Crumb Cake and punched it out using the large Oval punch.  I filled the carton with doggie treats, and then used a clip from the Clips Assortment set and finished it off with a bit of Crumb Cake Seam Binding Ribbon.  As you can see on this picture, Ozzie sniffed out that there was a present for him in the box, and he nearly gave the game away as I wanted to wait until everyone was there before giving the gift to the Ama.


Here's the mini milk carton - isn't it cute!


Below are some of the cards we made for the Make and Take, the guests loved it and had a great time making it.  I was really pleased with their cards as they moved things around so they were different to mine.  I'll certainly be using their designs for this card again. The cardstock is Cherry Cobbler, with Crumb Cake cut with the Top Note die.  This was then stamped with Chocolate Chip ink using the Woodgrain background stamp.  I was so pleased when this came into the new catalogue, it's perfect for using with the Owl punch and so much more. The border is Cherry Cobbler from the Regals Collection Designer Paper Stack, with a strip of Old Olive punched with the Scallop Border punch.  The owl itself was punched using Cherry Cobbler, Whisper White, and Crumb Cake, with a leaf cut from Old Olive using the Bird Builder Punch.  The sentiment is from Contempo Christmas stamp set, in Chocolate Chip ink.  The belt of the owl is Basic Black 1/8" (3.2mm) Taffeta Ribbon, finished with a Rhinestone Jewel.


Here's a few other Christmas Owl cards I made, when I was deciding what to do for the Make and Take project. The first is a simpler version of the one above, with Old Olive cardstock. The second one uses the Vintage Wallpaper embossing folder instead of the wood stamp, and has been inked using the sponge daubers on the raised areas.  Curly Cute has been used on these cards for the sentiment.


If you'd like to make any of these items, and would like to host your own Stampin' Up! workshop from the comfort of your own home, please contact me.

Monday 7 November 2011

It's Good To Be The Hostess Promotion

Evening!


In addition to all the benefits of hosting your own Stampin' Up! workshop, between the 1st November to the 15th December 2011, for a short time only, there are even more reasons!  Hold a £300 workshop, and earn the Paisley Petals Stamp Set and the co-ordinating Paisley Petals Designer Paper Series for free, worth £33.90.

Contact me now to book your workshop!

Sunday 30 October 2011

Light Night Leeds - Craft Garden

Today seems to be a good day for catching up with overdue blog posts, and I'm on a roll - so here it is - the long awaited post about what kept me very, very busy for a few months at the end of the summer.  Earlier in the year, I joined a craft club in Headingley, Leeds.  It's a great group and I've made lots of crafty like minded friends, who totally understand the addiction to all things crafty! It's very reassuring, to know it's not just me who drools over stamps and wool and craft books!  Anyway, one Bank Holiday Monday spent in the pub, a few of us put together a proposal for Light Night Leeds http://lightnightleeds.co.uk/.  Our idea was to create a Craft Garden, using crochet, knitting, felting, paper crafts, and plenty more. We'd originally wanted to put it in garden sheds, but then changed to using the Victorian prison cells under Leeds Town Hall. Things went quiet for a while, when we were waiting to hear about the funding, which then was confirmed, and we had about six weeks until the night. As you can imagine, it was pretty hectic, and we didn't really have an idea what it was going to turn out like until the day before.  I don't think there was any of the group who at some point, who didn't have a weird crafty dream, we couldn't even escape the stress of it in our sleep!  In the end, it was totally worth it, and there was a constant stream of visitors on the night, with over a 30 minute wait in the queue! It was amazing to hear the compliments and oohs and ahhs, and people asking if they could take pictures.

Unfortunately, I forgot to take my camera with me on the night, but luckily there were a few talented photographers in the group, who have let me use their photos on here.  I've mainly posted the photos of stuff I made, but for anyone who wants to see the full set on Flickr, check them out here.  The behind the scene / setting up shots can be seen here and for an idea of how busy the evening was, see here.

We had three cells - an English Country Garden, a Night Garden, and a Tropical Garden.  Most of my creations were for the English Country Garden.  As well as the crafty items, we had a hidden CD playing with bird noises, and some flowery smelling essential oils to make it more realistic and to hide the damp smell!)  Below are a few general shots of the cell.


In this picture, you can see my crocheted mange tout, and some vegetables created by some of the other members of the group.


These are the crocheted daisies I made, with a beaded ladybird in the pot too.


These are some more daisies, this time made with the Stampin' Up! Flowers, Daisies #2 Die, in Whisper White card stock, and inked round the edge with Cherry Cobbler ink.  The buttons were from my craft stash, and the stems made from garden wire.


Using the Flowers, Daisies die again, I made some gerberras, using Melon Mambo card stock, and inked round the edge with Cherry Cobbler ink.


These are my favourite creation - the fuchsias! These took longer than I want to remember, but I'm really pleased with the outcome.  They were made using Melon Mambo, Elegant Eggplant and Old Olive card stock, and punches 5-Petal Flower, Scallop Oval, and Boho Blossoms.  These were also inked around the edges with Cherry Cobbler Ink.  I think there were about 80ish fuchsias altogether.  I got the idea for the fuchsias here, I love finding new things to make with the punches.


These are my birds, I have made plenty of these this summer! My friend Kylie got married recently (blog post to follow!) and we made these for her wedding.  I'd brought them to Craft Club, and they were really popular, and I was asked to make a few for the Craft Garden.


This is a bunny I made from the book "Crafting Springtime Gifts" by Tone Finnanger.  In the background on the floor next to the bunny, you can see the leaves made using the Stampin' Up! Leaves #2 die.


I didn't get photos of the next few items on the night, but luckily I took some pictures while they were being made.  These are my leaves, made by cutting an inch strip of Old Olive card stock with the Paper Cutter, then scoring it down the middle.  Using the Extra Large Oval Punch, the leaf was cut, and then run through the Crimper to give the leaf texture.


This is a picture of another beaded item - bumble bees.  I didn't get a good picture of these - they were tied onto invisible nylon string and keep moving around!


Finally, here's a picture of my crocheted fern leaves.  I made ten of these, and they were used in the tropical garden.


On this picture, you can see the doughnuts, cakes and felted battenburg cake, made by my sister Judith - don't they look tasty!?


Here's a couple of pictures from the other two rooms.   Don't they look great! The Night Garden was full of little LED lights, stars, owls, a fox, mushrooms, toadstools and leaves.


The Tropical Garden was full of recycled items, and loads of clever props to create vines, trees and a waterfall.


So, I think that's the end of my mega post for today.  I hope you liked the pictures, and take a look at the rest of them on Flickr.  Please contact me if you'd like to know how to make any of them items, or if you want to get your hands on the things to make them. 

Leave a comment, I'd love to know what you think!

Stamp a Stack - New Catalogue

I'm not keeping up with these blogs posts very well at the moment am I?! After a busy month or two with the Light Night Craft Garden, and the two weddings, I've given myself a well deserved rest. 

As a good way of getting my crafting mojo back, on Monday I attended Julie Kettlewell's Stamp a Stack card making class.  We made 12 cards, 6 designs, in three hours.

Here are the cards we made - aren't they nice!

The first card is made using the Polar Party stamp set, with Lucky Limeade and Real Red cardstock.  The borders were made with the Dotted Scallop Ribbon Border punch, and finished with a bow made from the 3/8" (1cm) Ruffled Ribbon in Lucky Limeade.


Card - Lucky Limeade, Cherry Cobbler, Whisper White
Papers - Real Red Brights Patterns Designer Paper Stack
Stamp Set - Polar Party
Embellishments - 3/8" (1cm) Ruffled Ribbon in Lucky Limeade
Tools - Dotted Scallop Ribbon Border punch
Inks/Markers - Basic Black, Lucky Limeade, Cherry Cobbler, So Saffron


The second card is made using the Everything Eleanor stamp set, with the sentiment from the For My Family stamp set.  The card stock is Soft Suede and Very Vanilla, using Early Espresso and Crumb Cake inks. 


Card - Soft Suede, Very Vanilla
Papers - Mocha Morning Speciality Designer Series Paper
Stamp Set - Everything Eleanor, For My Family
Embellishments - 3/8” (1cm) Taffeta Ribbon – Crumb Cake
Tools -
Inks/Markers - Crumb Cake, Early Espresso

Friday 14 October 2011

Off to a wedding

Morning all!

Today I'm off to my third and final wedding of the year. I'm looking forward to it, of course because my friends are getting married, but also because the bride is a craft obsessive like myself, and we've spent many hours over the last few months making things for the big day. There's been plenty of Stampin' Up! products used, so can't wait to see what it all looks like! I'll make sure I take plenty of photos.

Have a nice weekend everyone.

Alex

Sunday 9 October 2011

Host A Workshop & Hostess Benefits


Hostess Benefits have changed in the 2011-2012 Idea Book & Catalogue.  If you host a Stampin' Up! Workshop in your home, you can receive some great products for free, as well as having an fun filled crafty session with friends and family.  For more information, click here

The table below shows the new benefits.


You now earn "hostess pounds", to spend on exclusive, specially priced hostess products, and once sales reach over £300, you will earn full price items at 50% off.  Click here to see the hostess products.

Don't forget, you also receive a free copy of the new catalogue, so you can spend hours looking through it at your leisure!

Contact me now to book your workshop.  If you don't live locally, you can still earn the benefits of a Workshop, as long as your order reaches the minimum amount of £150.

New 2011-2013 In Colours


With the new catalogue, comes five new gorgeous colours - Pool Party, Calypso Coral, Lucky Limeade, Wisteria Wonder and Island Indigo.

If you join the Stampin' Up! family during October, you will receive the In Colour Kit, containing five Classic Stampin' Pads and Card Stock absolutely free, worth £27.95!  Read more about the offer here.

The starter kit costs £119, and contains products worth over £250, everything you need to either start your own Stampin' Up! business or hobby.  Click here to read all about the starter kit.

2011-2012 Idea Book & Catalogue

Evening!


I've been a little bit busy recently, keep an eye out, blog post to follow to update you with what crafty things I have been up to.  This blog has been neglected, but I'm hoping to fix that in the next few weeks.

So here it is, the much anticipated 2011-2012 Idea Book & Catalogue.  I hope you like it as much as I do, and I can't wait to get my hands on some of the new products.  One of the new product lines I'm very excited about is the Designer Fabric, good for all you sewing types, check it out here!  To view the catalogue online, please click here, or contact me to buy one.

Please contact me if you would like to place an order, or you would like to host a workshop.

Friday 9 September 2011

Retiring Items


The new 2011-2012 Stampin' Up! catalogue is due to be released on the 1st October. Some of the items from the current catalogue are being discontinued. With up to 40% discount on many items, there are great savings to be made. Click here to see the list Retired List

Please contact me to place an order - once the items are out of stock, they'll be gone forever! The list is updated at the end of every day, so keep an eye out on what's gone already. The items are only available until the 30th September, so be quick!


Hello

Hello there!

I've finally got round to starting a blog!  It's something I've been meaning to do for a couple of months now, but couldn't quite get my head round what to do.  Hopefully, I've mastered it now, and here we are. 

So, a bit about me....

I'm a craft addict basically.  I've tried my hand at most things, some I have mastered, others, well, I'll keep trying! It all started off with making a few cards, I felt the need to have some creative outlet in my life.  One box of supplies quickly turned to two, then three, and now, somehow I've filled my spare room! When I heard of Stampin' Up!, I couldn't believe I'd been missing out on so much crafty goodness, and the decision to become a demonstrator didn't take long! 

I'm looking forward to sharing my cards and projects using Stampin' Up! products, as well as keeping you up to date with the lastest offers and promotions.  I've got a few blog posts planned already from things I have previously made, so watch this space.  I'll also be posting other crafty things I make, and hopefully can provide lots of inspiration for you.

Please drop by and leave me a message, I'd love to know who's reading!