Showing posts with label Large Oval Punch. Show all posts

Wednesday, 25 September 2013

All that glitters!

Morning!

I went to a 40th birthday party last Saturday, it was fancy dress in the style of 80s glam, Studio 54 and New Romantic. After much browsing, I ended up with a costume that was designed to be a buccaneer which I thought looked a bit Adam Ant. 

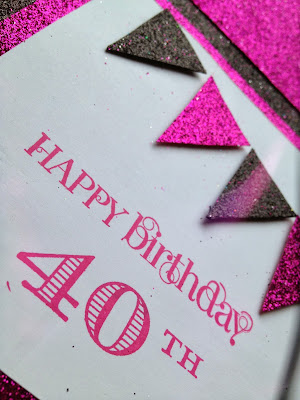
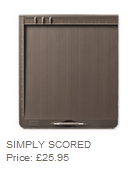
I wanted to do a fancy card for the occasion, and what better design than the Wow card that I've made for a few special occasions. I knew the party was going to be glitzy, and I wanted the card to match. Off I went to my local craft shop, and found the perfect papers.  I used a sheet of 12" x 12" Basic Black card stock, and using the Simply Scored Board I scored the lines to make the folds in the card.  I cut out various triangles of the glitter paper, and stuck them onto the front of the card.  


I used the Curly Cute stamp set for the Happy Birthday sentiment, and the numbers are from the Memorable Moments stamp set, stamped with Melon Mambo ink.  I used the Petite Pennants Builder Punch to make the bunting across the top of the card.


Here's the card all tied up with the band around the middle. The Large Oval Punch was used to punch out the numbers, and the Decorative Label Punch was used for the label.


Items Used

All the items (except the glitter paper) can be bought from my online shop.  Click on the links below.


Tuesday, 14 May 2013

Papillion Potpourri Card 4

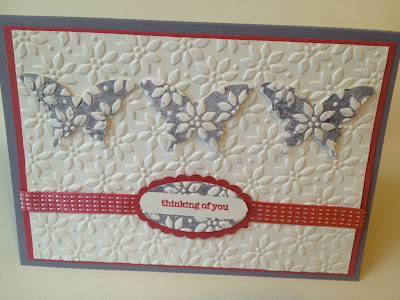
Here's the fourth Papillion Potpourri card.  This card has a fancy technique on it that you might want to try if you never have before.  The butterflies have the same embossed pattern as the background, but have colour added.  The butterflies were punched out with the Elegant Butterfly punch, and the Petals-a-plenty embossing folder had Wisteria Wonder ink rubbed all over it.  The butterflies were run through the Big Shot, and the result is that the ink is transferred to the flatter areas of the embossed card.  Clever eh!  The Scallop oval punched card was run through the Big Shot too, and mounted onto a Primrose Petals card which had been punched out with the Scallop Oval Punch. A strip of the Stitched Satin Ribbon was placed across the card.


Saturday, 1 December 2012

Advent Calendar

I can't believe it's December already! Where has the time gone? I hope you all opened your advent calendars this morning, and got something nice.  I thought I'd share with you the advent calendar I have made.  I got the idea after I had shown a few friends the treat boxes from the Buns and Roses workshop, as a few people said they'd make a good calendar.  I made 24 treat boxes, using the Be Of Good Cheer papers, and used the Memorable Moments stamp set for the numbers.  It's a great stamp set, it's got all the numbers, and can be used for birthdays or anniversaries.   I can see this set will get a lot of use.  I punched out the numbers with the Large Oval Punch and the Scallop Oval Punch, and used Gumball Green and Cherry Cobbler card stock.  Cherry Cobbler seam binding ribbon was used to tie the boxes at the top.  I then hung them at random on my favourite Christmas decoration I own, a wire tree that I bought a few years ago. I normally use it to display my cards, but this year I'll have to find somewhere else to put them.


There weren't quite enough hearts to place the boxes over, so I decorated some clothes pegs to make some extra hooks.


My sister was over on Sunday afternoon, and she saw my project and wanted to make one too.  She used the Festival of Prints papers to make hers from.  I'll share a picture when she has it all set up and displayed.  She said she was going to come to my house and fill mine up, so I wonder what will be in my boxes each day!


Thursday, 29 November 2012

Buns and Roses Workshop - Treat Boxes

Morning,

This is the last post about the Buns and Roses workshop.  The fourth project was to make two little treat boxes, that small gifts or sweets can be placed inside.  I've made these a few times now, and they really are easy.  They are just a rectangular piece of paper, scored in half lengthways on the Scoreboard, and then scored from the middle of the narrow side to the fold in the middle.  If you'd like to make these, please send me an email or leave a message on here with your email address and I'll send instructions.  The papers used for this project was Be Of Good Cheer. The crop-a-dile was used to make holes in each side, and Cherry Cobbler seam binding ribbon was threaded through to make a bow on the top.  The Merry Christmas stamp is from Teeny Tiny Sentiments, and was punched out with the Scallop Oval Punch and the Large Oval Punch.  There was a tin of Caburys Heroes on the table, and it was funny seeing a few of the ladies asking how to tie them up, after cramming as many sweets in there as they could (or couldn't as it happened, they can only hold two chocolates!)

I really enjoyed the workshop, and hope to do something like that again sometime.


Saturday, 3 November 2012

Betsy's Blossoms card

Most of the cards that were made for the Inspiration Station were based on the colours in the Floral District set. I had a card commission to make that weekend for a wedding, and I'd spotted a card like this on Pinterest. 


I liked the simplicity of it, so decided to recreate it. I made one card for the Inspiration Station and another for the wedding. The colours are Basic Black, Basic Gray and Rose Red. I used the Betsy's Blossoms stamp set again for this card. Rose red ribbon seam binding ribbon was tied around the card, and a sentiment from Teeny Tiny Wishes (now called Teeny Tiny Sentiments) was stamped and punched with the Large Oval Punch and mounted onto a border punched with the Scallop Oval Punch.

Because the card stock was black, I used the Decorative Label Framelit dies to cut out a shape where the writing could be seen in the inside of the card. I stamped the leaf image for a bit of extra detail.


Friday, 19 October 2012

Stamp-a-stack Christmas 6 - Joyous Celebrations


This is the last blog post about the Stamp-a-stack class I went to a few weeks ago. I'm pleased I've got through these all now, as I've been busy with lots of other projects I can't wait to share. I've made lots of Christmas cards, I helped my downline prepare for her "Inspiration Station" at our team training event which is tomorrow, I've had a customer workshop, and in a few weeks time I am running a workshop at the Buns & Roses Leeds City Centre WI. Busy eh!

This card uses the Joyous Celebrations stamp set, with the new embossing folder called Holiday Frame. Gumball Green card stock was used for the card blank, with Whisper White. You might notice on the pictures that some of the white card is wrinkled. A tip I have read on how to avoid this, is to slightly dampen the paper first. I've not tried this tip yet, but I'll let you know if it works. The oval frame was punched with the Large Oval Punch, and the cards were decorated with the new Silver Sparkle Dazzling Details, a little tube of silver glitter glue with a fine nozzle for easy application. Nice simple effective cards aren't they?

I'll be back soon hopefully with lots to share. As I mentioned above, it's our team training day tomorrow, so I'll have my swaps to share with you, and lots more.


Thursday, 20 September 2012

Shoe Box Swap - Twitterpated Crackers

This is my last blog post about the Shoe Box swap event. I really enjoyed the day, and am looking forward to the next one.

This post is to share with you the project that was designed by my downline and friend Kylie. She's always coming up with great ideas, I don't know where she finds them! If you fancy taking a look at her blog, click here. These are crackers made with the Twitterpated papers, with the label from the Tea Shoppe stamp set.

The crackers were made by cutting slits in a rectangular piece of paper, which was the rolled into a cylinder and stuck with the sticky strip. Bakers Twine was tied tightly around the ends, and a chocolate sweet, a message and the snap was placed inside. Seam binding ribbon in Cherry Cobbler and Baja Breeze was tied around the ends to hide the Bakers Twine.

I love making or receiving swaps with sweets inside, but these are safe, as don't want to ruin them. They can be my real emergency chocolate stash when I really need it!!


Sunday, 19 August 2012

Craft Decathlon - Mouthwatering Cherries

This is the second time I have written this blog post! Argh. The Blogger App on my phone was playing up, so I closed it down, and lost this post. So I'm writing them all in the Notes App on my phone, and keeping my fingers crossed I don't lose it again!

This is another card made using the Mouthwatering stamp set, but with the cherries this time. The cherries image was stamped onto the Whisper White card stock with Lucky Limeade ink, and a Jelly Bean brad placed near the leaf. Eight cherries were stamped in Real Real card, using the 1" (2.5cm) Circle Punch. One was placed flat on the cherry, then the other three stuck together to create a 3-d raised effect. The White uni-ball Signo gel pen was used to create a shine. I've used lots of white ink pens before, and this one is by far the best. The cherries paper from Sweet Shop was placed over a strip of Real Red card stock, which had been punched with the Scallop Trim Border Punch. The Just for You sentiment from Oval All was stamped in Real Red, and punched out with the Large Scallop punch, and mounted onto a Lucky Limeade Scallop Oval Punch piece of card. The Birthday Wishes sentiment is from Sincere Salutations. The Lucky Limeade marker pen was used to create a stitched image around the edges of the Whisper White card layers. For anyone who hasn't used the markers, they are dual tip, with a fine end for writing and a brush tip for colouring images and stamps. They match all the papers and card that Stampin' Up! offer. They can be bought individually, in sets of 10 in the colour families, or as a full set.


Saturday, 18 August 2012

Craft Decathlon - Mouthwatering

Evening!

I'm pleased with my blogging process this week, and I feel like I'm catching up at last. I hope it lasts, I've still got plenty of cards and projects to share. I went to a Shoebox swap event today, so I've got lots of lovely things from that.

Here's another card from the Craft Decathlon class. The Sweet Shop papers were used again, with the stamp set Mouthwatering. To get the cone, ice cream and the cherry different colours, the marker pens were used to colour the stamp. On the Wisteria Wonder card, the Adorning Accents embossing folder was used to make the embossed hearts. These are thin embossing folders, which just give an extra level of detail to your cards and projects. The Adorning Accents Edgelits Die was used to make the scalloped bottom on the panel. The sentiment You're So Sweet is from the Sweet Cake stamp set, cut out with the oval punch and mounted into a piece of Pool Party card punched out with the Scallop Oval Punch. Pool Party Ruffled Ribbon was tied around the card, as well as around the corner of the ice cream image, and a Jelly Bean brad was attached.

A lovely summery card, don't you think?


Monday, 18 June 2012

Stamp-a-stack 3 - Bright Blossoms

Evening,

Sorry for the lack of posts recently.  I've been having trouble with my broadband connection, it's been a bit hit and miss, so I unplugged it for a few days, and then plugged it back in this evening, and now it seems to be working.  Maybe it just needed a rest, and was tired from all the card surfing I do!  As a result, I'm behind again with my blog posts, so I promise I'll try my best this week to get up to speed, and set up a few scheduled posts. 

This evening, I'm sharing another card from the last Stamp-a-stack class.  This one was one of my favourites, I loved the layout and the design of the card.  I'll be using this layout again, it could be used with any colour combo or stamp set.

This uses the Bright Blossoms stamp set from the Summer Mini Catalogue, and the colour combo of Pumpkin Pie, Melon Mambo and Rich Razzleberry, with a touch of Old Olive.  The vase and petals were stamped onto Whisper White card stock, then punched out with the Large Oval punch, and then the flower head stamped and cut out, with a dimensional used to give it a bit of depth.  The Decorative Label punch was used for a border.  The sentiment is from Happiest Birthday Wishes, which was punched out using the 1-1/4" Circle punch, with the Scallop Circle punch used for the border.  The dotty paper is from the Brights Paper Stack. 
 
The front of the card
The card showing the folds

The inside of the card with a panel of Whisper White for writing a message

Papers / Card Stock - Pumpkin Pie, Melon Mambo, Whisper White, Brights Paper Stack
Stamp Sets  - Bright Blossoms, Happiest Birthday Wishes (Hostess Set)
Embellishments - Old Olive Scallop Dots Ribbon, Dimensionals
Tools - Large Oval Punch, Scallop Circle Punch, 1 1/4 Circle Punch
Inks / Markers - Melon Mambo, Rich Razzleberry, Pumpkin Pie, Old Olive

Tuesday, 12 June 2012

Stamp-a-stack 2 - Mixed Bunch

Morning

Here's the second of the Stamp-a-Stack cards, using the Mixed Bunch stamp set.  I actually received this stamp set at the recent all day regional training day, another one of the benefits of being a Stampin' Up! demonstrator - freebies! I'd previously bought the matching Blossom punch too, so that was handy.

This card uses the colour combo of Pear Pizazz, Peach Parfait, Poppy Parade and Daffodil Delight.  The flowers and shapes were stamped at random on the Whisper White card stock, and then two were stamped and punched out, and fixed with a brad.  A strip of Poppy Parade ribbon was used, and the sentiment punched with the oval and the scallop oval punch.


Papers / Card Stock - Pear Pizazz, Peach Parfait, Whisper White
Stamp Set - Mixed Bunch, Petite Pairs
Embellishments - Rhinestone Brad, Poppy Parade Ribbon
Tools - Blossom Punch, Scallop Oval Punch, Oval Punch
Inks / Markers - Pear Pizzaz, Daffodil Delight, Poppy Parade, Peach Parfait

Monday, 21 May 2012

Regional Training - Summer Mini Catalogue card front

This is another post about the Regional Training I attended in Leeds on Saturday.  We were asked to bring a card front, or a mini scrapbook page, using products from the new Summer Mini Catalogue.  As I've got a card class on Tuesday evening, I decided to make a card that I could use in the class too.  The class is based on a Diamond Jubilee theme, using all things royal and British.  I thought the new Tea Shoppe Stamp set would be ideal.

I stamped the tea cups in Riding Hood Red and Not Quite Navy ink onto Whisper White card stock.  This was mounted onto Riding Hood Red card stock, and then I used the Paper Piercing Tool to create a dotted border around the edge.  The tool comes with a clever see through mat, so you can line up around the edges of your card and make holes in a straight line.  I then stamped the Stay sentiment onto a strip of Whisper White card stock, and mounted it onto a strip of Not Quite Navy card stock that had the edge punched with the Scallop Border Edge Punch.  I added a strip cut from the Lace Ribbon Border punch in Riding Hood Red.  To finish it off, I stamped the flower from the Tea Shoppe set, and then used the Scallop Oval Punch for a border.


I hope my card is liked at the Regional training day, and that my class attendees enjoy making it too.  It's a perfect card for where I hold my classes, at Dock Street Market, as they serve cocktails in tea pots and china cups!


  I think I need to put the kettle on now, who doesn't love a nice cuppa! Tea anyone??


Friday, 18 May 2012

Little Princess Stamp-a-stack card

I attended a Stamp-a-stack class a few weeks ago, and only getting round to posting these now.  I've got another one in a weeks time, I'll have only just finished posting the last lot and I'll have six more to write up!
 
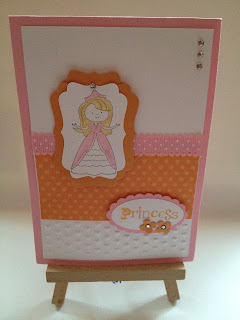
This card uses the Little Princess stamp set, and the colours are Peach Parfait, and Pretty in Pink.  The princess was stamped with Basic Gray onto Whisper White card stock, and her hair was coloured with a So Saffron marker.  The Decorative Label punch was used to cut her out, and then used to make an extended border around her in the Peach Parfait card stock.  The new Adorning Accents Textured Impressions Embossing Folders were used to make the hearts embossed panel at the bottom of the card.  These are thin embossing folders, which can be positioned anywhere on the card.  The Large Oval Punch was used to punch out the Princess sentiment, and then mounted onto the Scallop Oval Punch for a border.  The Itty Bitty Shapes Flower Punch was used to punch out the flowers on the sentiment.  I like this card and stamp set, perfect for all the little princesses in your life!


Papers / Card Stock - Peach Parfait, Pretty in Pink, Whisper White, 2010-20112 In Colour Patterns Designer Series Paper Stack,
Stamp Sets - Little Princess
Embellishments - Rhinestone Jewels, Pretty in Pink Scallop Dots Ribbon
Tools - Big Shot, Adorning Accents Textured Impressions Embossing Folders, Decorative Label Punch, Itty Bitty Shapes Punch, Scallop Oval Punch, Large Oval Punch
Inks / Markers - Basic Gray, Pretty in Pink, So Saffron, Peach Parfait

Saturday, 7 April 2012

Stamp a stack - Cupcakes Card

Here's the final card from the Stamp-a-stack session.  It uses two of my favourite items at the moment, the Cupcake punch and the Create a Cupcake Stamp Set.  These are only available until the end of April, I'll miss them a lot.  For this card, Pool Party, Chocolate Chip and Regal Rose card stock were used.  I learnt  a new technique with this card, called Inlaid Embossing.  Various sizes of circles were punched and then glued to the Whisper White card stock, then the whole thing was run through the Big Shot with the Square Lattice embossing folder.  The Large Scallop Circle Punch, another product that will not be available after the end of the month, was used to mount the cupcake.  To finish it off, the Satin Ribbon was attached, and the Happy Birthday sentiment was stamped and punched with the Large Oval Punch and the Scallop Oval Punch.  I'll be making this card again soon!


Paper / Card Stock - Pool Party, Whisper White, Regal Rose, Chocolate Chip
Stamp Set - Create a Cupcake
Embellishments - Satin Ribbon
Tools - Large Scallop Oval Punch, 1-3/4" Circle Punch, 1" Circle Punch, 1/2" Circle Punch, 3/4" Circle Punch, Scallop Oval Punch, Large Oval Punch, Cupcake Punch
Inks / Markers - Pool Party, Regal Rose, Chocolate Chip

Sunday, 1 April 2012

Creatively Yours Set

This is another project that I was kept busy with at Kylie's when we had our craftathon weekend! I'd seen this on Pinterest, and thought I'd give it a go. The 2011-2013 In Colours were used, stamped onto Whisper White card stock.

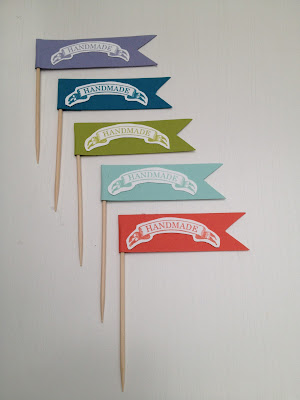
The "Handmade" banner stamp was cut around and placed onto a flag cut in the same colour card stock, and stuck onto a cocktail stick.

The "Made with my own two hands" stamp was stamped and punch with the 1 3/4" Circle Punch and the Scallop Circle Punch.

There was a bit of cutting out to do for the "Made just for you" stamp, and I added a flower punched with the Itty Bitty Bits punch, and added a Rhinestone Jewel in the centre.


The "Handstamped" stamp was just cut around.


The "Deliciously made for you" stamp was punched with the Large Oval Punch and the Scallop Oval Punch, as was the "From the kitchen of"


The "Created By" stamp was punched with the Decorative Label Punch, and ink applied around the edge with the Sponge Daubers.


Here they all are together as a set.  These would look great attached to home made produce or gifts, or just used as sentiments on the back of a card.  For any of you crafters out there that sell your crafts, Stampin' Up! operate under the angel policy, which means you can sell products you have made with Stampin' Up! images, as long as it displays one of the (c) Stampin' Up! images on it to protect their copyright.